
Description
Method 1: GIMP
! This method should only be used by beginners. Once you are familiar with the workflow, use the bash script instead as it is significantly faster.
Requirements
Ofnuts' Tiles plug-in
Extract the "ofnuts-tiles.py" file into your GIMP install directory at "GIMP 2/lib/gimp/2.0/plug-ins/"
___________________________________________________________________________________
Step 0
- Get a heightmap and matching alphamaps. You can generate them with a program like Gaea or find some online for free. Download the files used in this tutorial here.
(Heightmaps should be in 16-bit .png or .exr format to ensure maximum detail.)
___________________________________________________________________________________
Step 1 - Tiling the Heightmap
- Load your heightmap into GIMP.
(If you're using the files supplied in this tutorial, the heightmap is "height.png")
-
Resize the heightmap with Image > Scale Image... to match your WoW map dimensions in ADTs x 257.


(Our map will have 10x10 ADTs, so we need a 2570x2570 heightmap.)
-
Export your heightmap tiles with File > Export tiles > Export tiles (by rows and columns).

(If you don't see this option, the plug-in isn't installed correctly.)
- In the Export tiles options box use the following settings.

Directory: Create a folder somewhere for your heightmap tiles
Tile Name: Mountains_{column1}_{row1}_height.png
Rows: 10
Columns: 10
- Click OK and sit back while GIMP exports the image as 100 individual tiles using the naming convention we supplied, which matches what Noggit Red is expecting for heightmaps.
___________________________________________________________________________________
Step 2 - Tiling the Alphamaps
- Load your layer1 alphamap into GIMP.
(If you're using the files supplied in this tutorial, the layer1 alphamap is "layer1.png")
- Resize the image with Image > Scale Image... to match your WoW map dimensions in ADTs x 1024 using 3.780 pixels/mm resolution.

(Our map will have 10x10 ADTs, so we need 10240x10240 alphamaps.)
NOTE: The alphamaps supplied in this tutorial are being scaled up from 4k to 10k, but this is only done for convenience and will produce a blurry texture mask. For best results your heightmaps and alphamaps should be as close to the intended size as possible, or scaled down if necessary.
- Export your layer1 alphamap tiles with File > Export tiles > Export tiles (by rows and columns).
-
In the options box that pops up, use the following settings.

Directory: Create a folder somewhere for your alphamap tiles
Tile Name: Mountains_{column1}_{row1}_layer1.png
Rows: 10
Columns: 10
-
Click OK and wait for GIMP to finish.
- Repeat the process for the layer2 and layer3 alphamaps.
Method 2: Bash script (Recommended)
Requirements
ImageMagick (16-bit HDRI)
___________________________________________________________________________________
Step 0
-
Get a heightmap and matching alphamaps. You can generate them with a program like Gaea or find some online for free. Download the files used in this tutorial here.
(Heightmaps should be in 16-bit .png or .exr to ensure maximum detail.)
___________________________________________________________________________________
Step 1
- Download the Noggify_Texturemaps.sh bash script and place it in a folder with your texture maps. Open the file with a text editor and configure the variables. (They are preset to follow the rest of this tutorial.)
___________________________________________________________________________________
Step 2
- Double-click the bash script to run it and create your texture map tiles.
___________________________________________________________________________________
Step 3 - Noggit Red Setup
- Launch Noggit Red and create a new project.
-
Create a new map named Mountains with 10x10 ADTs starting at 1-1.
 (Set the map expansion to latest for maximum in-game view distance.)
- Copy the heightmap and alphamap tiles into your Noggit Red project folder at "/world/maps/mountains/".

(The folder contents should look like this, with one heightmap and three alphamaps for each ADT.)
___________________________________________________________________________________
Step 4 - Importing the Heightmap
-
Enter your map in Noggit Red and import the heightmaps with Assist > Global > Import > Import heightmaps using a multiplier of 3000.

(You can play around with the multiplier to increase or decrease the vertical "stretch" of the terrain.)
- The terrain should now be deformed.
-
Load all ADTs with Assist > Global > Debug > Load all tiles

- Reset the lighting and shadows on the terrain by using a sculpting tool with maximum brush size and 0.00 speed.
-
Fix gaps in the terrain with Assist > Loaded ADTs > Fix gaps

- If you come across impassable tiles, go into Impass Designator mode and use ctrl+left click on the greyed-out squares.
___________________________________________________________________________________
Step 5 - Applying Texture Layers
-
Press U to enter tile mode and zoom out so you can see the entire map.
 (If you see black spots on your map in tile mode, go back to the normal view and raise your camera height with Q.)
-
Using the largest brush possible, paint your map with a base texture at 100% opacity. I used rock.

-
Repeat the process with a second texture. This is the texture that will be masked off by your layer1 alphamap. I used soil

-
Repeat the process with a third texture. This is the texture that will be masked off by your layer2 alphamap. I used grass.

- Repeat the process with a fourth texture. This is the texture that will be masked off by your layer3 alphamap. I used sand.
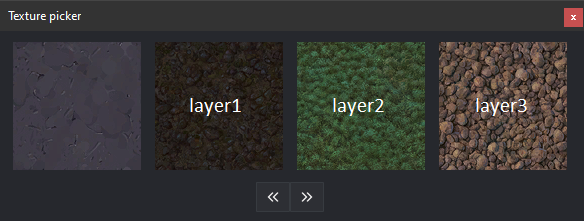
- In Texture Painter mode, ctrl+click somewhere on your terrain to bring up the texture picker. You should see 4 textures.
___________________________________________________________________________________
A Note on Alphamapping
(Color used for visual purposes only, alphamaps must be in grayscale)

Get your alphamaps from an RGBA splatmap to avoid overlap between layers. The R/G/B channels define the opacity of layer 1-3 and the alpha channel defines the base texture.
___________________________________________________________________________________
Step 6 - Importing the Alphamaps
-
Import the alphamaps with Assist > Global > Import > Import alphamaps. After everything loads you should see the final product.

-
 1
1
Recommended Comments
Create an account or sign in to comment
You need to be a member in order to leave a comment
Create an account
Sign up for a new account in our community. It's easy!
Register a new accountSign in
Already have an account? Sign in here.
Sign In Now