Search the Community
Showing results for tags 'worldmap'.
Found 6 results
-
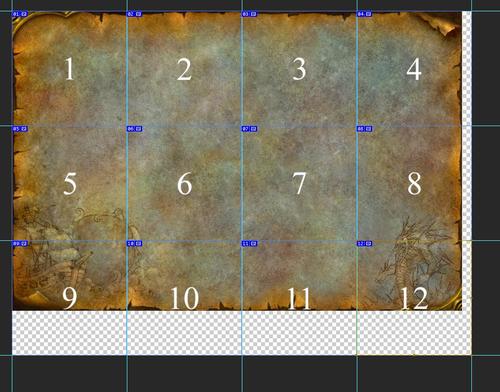
Hi there, Today I'd like to share some of my knowledge regarded to creating a working world map in-game. I will try to cover the most basic things, but I have to admit there are still some unknowns to me such as clickable zones on the world map, however, I 'd like to cover those and continents map in the future. In this tutorial I will cover a basic in-game map creation for GM Island. Required tools: Dbc Editor MPQ Editor Photoshop or any other image editor (I myself use Photofiltre) World Map Tutorial Package - download link down below (I recommend you downloading this, because I think it is useful for you to reverse engineers the stuff done in present tutorial). Link to the source: https://mega.nz/#!zUpxlYpK!ctrulp0IpFncI8FYAOFsLwm64PPn9lZyzXSQkNaJ7RQ (Either copy the link with the yellow decription key to your browser, or use the decription key in yellow to acces the file.) Difficulty - Easy Estimated time - 15-25 minutes Before sinking teeth into technical details concerning map implementation you might want to check out a WoW Map Template by Balkron and a short video attached to it - So first of all some theory. When it comes to Dbc files what really matters to us right now is WorldMapArea.dbc. This Dbc looks somethings like this: Now to some collum information: 2. - this collum refers to map.dbc and literally says on which map is this world map going to be placed (1 stands for Kalimdor). 3. - this one refers to the area name (the dbc number), in this case it is 876 (GM Island). 4. - the map file name - this just refers to your file names, so if I decide to call it GmIsland all the files will have to named that way - GmIsland_1.blp, GmIsland_2.blp... 5. - upper y coordinate of your map (serves coordinates). 6. - lower y coordinate of your map (serves coordinates). 7. - upper x coordinate of your map (serves coordinates). 8. - lower x coordinate of your map (serves coordinates). 9. - has to be -1? 10., 11. - has to be 0? So this was some Dbc stuff. Now let's move to the real map stuff. Obviously what you need to is to create yourself a world map, Skarn has covered this topic some time ago, there is a link to his tutorial mentioned above if you need to create a map I recommend you going there. But now comes the tidious stuff. In order to make your map working you have to divide it into 12 256x256 images and name them just like this - GmIsland1.blp, GmIsland2.blp, this however, comes for GmIsland map, if you name your map in WorldAreaMap.dbc TelAbim you have to name your files TelAbim1.blp and so on. When it comes to chronology you have to follow the one shown in the picture down below. So GmIsland1.blp represents sector 1 and so on. This is obviously some really boring stuff, but it is essential. In addition, I think it is good for you to know that all the segments and the right (4, 8, 12) and all those on the bottom (9, 10, 11 ,12) have to be transparent and won't take the entire 256x256 area. Skarn has thought of this when making his map templates, so you don't really have to worry about this one. Now we need to put all the files into a patch, so that the game can loads those. The Dbc stuff is kind of obvious, you put that into DBFilesClient folder, and as for the blp files you have follow this chronology :Interface/WorldMap/GmIsland (Dbc name of your map)/GmIsland1.blp ... So once we are done with all of this, we can check the map in-game and see if it works. The maps seems to be working. If you are trying to create a world map for yourself, you should start by taking down the map coordinates (in-game or in the Noggit) and then according to that create the map. I hope this quick tutorial was helpful in some ways, and hopefully I will find myself some more time to extend it one day. Maybe I could cover making a new continent or making a zone clickable on world map. Link to the source patch - https://mega.nz/#!zUpxlYpK!ctrulp0IpFncI8FYAOFsLwm64PPn9lZyzXSQkNaJ7RQ (Either copy the link with the yellow decription key to your browser, or use the decription key in yellow to acces the file.) If you have some questions, or something doesn't seem to be clear, or perhaps doesn't work at all, do not hesitate and write it down, I will try taking a look at it. Update #1: December 2 2023 - Some minor tweaks & addition of link to Balkron's WoW Subzone Template Package and video.
-
Introduction Difficulty: Relatively easy Estimated time: 30 min - 1.5 h. Requires: Adobe Photoshop, MapTemplate.psd. Here is the example map that I am going to use as an example for the tutorial. The shape of the continent belongs to one Russian Minecraft project (Medieval Minecraft) and represents their world Asteros. I was too lazy to make something up on my own, so I decided to take this shape. I made this map in about one hour using a graphic tablet (can be also done without it), so it is not that complicated as it may look like. I created a new version of MapTemplate.psd based on the old one by Soldan and using the new WoW worldmap assets provided by Vellear. So, let's begin! Creation process Step 1. Getting the shape. Launch your Photoshop and open MapTemplate.psd. Choose the Ocean layer you prefer and make it visible (it may be with or without watermarks, I used the one without watermarks). Select the ground layer without making it visible. Now use the Lasso Tool (L) to paint the shape of your continent. You can also do it in many other ways, but the main point is to get a properly shaped selection on your canvas. Now switch to Rectangular Marquee Tool (M) and right-click somewhere on the selected space. In the context menu choose "Layer Via Copy". Now you will get the continent shape displayed on a new layer. It may look a little unsatisfactory (such as having a lot of rubbish around, weird shapes and so on), so you can clean it and master the shape using Eraser tool (E). Here is what I got after cleaning and working on the shape: Step 2. Adding details. Now pic up small radius hard brush and use Eraser Tool to paint small rivers, lakes and other details involving the landscape. It is important to use hard brush because soft ones make bigger borders around themselves, so it does not look that good. For this task graphic tablet with pressure sensivity saves tons of time. Here is the result: Now it is time to add some mountains to your continent. Select the layer with the mountain pattern and scale it to fit the size of your continent. You can reduce layer trasparency to see the continent shape through it, so you can decide the average size of the mountains. Switch back to your continent layer and right click on it, choose "Select pixels". This will select your continent again. Get back to the mountain layer and press "Ctrl + Shift + I" in order to reverse the selection. Press delete. Now you have your continent entirely filled with mountains pattern. Use soft brush and Eraser Tool to get rid of the unnecessary mountains and blend them with the ground. You can also make a copy of the original mountain pattern and cut some bigger mountains from there. Be creative to make something interesting. Here is what I got very quickly. Let's finish the shore lines now when the mountains are done. Switch to your continent layer and select its pixels. Go to Selection - Modify - Expand and enter some value like 10 or 12. The space between expanded selection and your continent is going to be your shoreline (water shelf). It should look somewhat this way: Choose the Coast Line layer, select Rectangular Marquee Tool, right-click on selection and choose "Layer Via Copy" in the context menu. Now you will have your shore lines, though they would not look blizzlike. In order to fix that we need to change layer blending settings. So, double click on the little icon representing the layer in the layer manager. Set a check box to "Inner Glow" and choose the appropriate color. Now it is time to get some decorative lines, representing the sea waves or whatever Blizzard thinks they do. They really add much style to the map. Make the Sea Lines layer visible, select continent pixels, get back to lines layer and press "Delete". Now remove the unnecessary lines all over your map using soft brush and Eraser Tool. You can also slightly increase the opacity of the layer as the default one is not on max. It will get more of a Blizzlike feeling. Step 3. Coloring the map. This is basically all you need to do to get a Blizzlike continent. Though, as we are modders, we should improve something, not simply replicate what Blizzard do to their continents. Let's make the map more interesting by coloring different climate zones or something like that. In general, let's go from the boring parchment color theme to something more colorful. Make a backup of the continent and mountain layers. Set the brush mode to "Overlay". Now use soft brush and Brush Tool (B) to paint colors on the ground. Then do the same with the mountains if necessary. That's all. Don't hesitate to leave feedback about my tutorial in the comments
- 17 comments
-
- 18
-

-

-

Version 1.3.3
423 downloads
Greetings This basic tool is for basic editing of worldmap It can load Jpgs/blps/pngs and saves all files as pngs so you will have to convert them on your own to BLP afterwards Its function is that you give it path to WORLDMAP folder of wow that needs to be extracted from MPQ and it will then cycle thru directories searching for actual worldmaps then it will list them so you can select which one you want to edit - once selected you can export map into a single image which is easy for editing in any image editor after that you can load this single image back to program and split it back into 12 images that blizzard uses Have a fun video showcase *Do you also hate when you start recording say: "Greetings" but in recorded video file it started recording just second after you said "Greetings"* -
-
In this video I am creating custom World of Warcraft styled worldmap using Adobe Photoshop and a custom .PSD template. The template can be downloaded here Big thanks to Vellear for providing Blizzlike assets for worldmaps.
-
Version 1.0.1
182 downloads
After using Skarn's updated MapTemplate.psd from Steff, you can use this template to cut your worldmap as Blizzard do to put it in game. I'll not make a tutorial about this template, this is not so hard to cut with selection tool. And, after cutting it and .png to .blp you need to work with DBC/DB2 files. Good luck !