Search the Community
Showing results for tags 'alpha'.
Found 4 results
-
TUTORIAL: BLEND MODE OVERRIDES (I'll try to update this tutorial often with new information) In this tutorial I'll show you how the blend mode overrides work in WotLK (or "vertex alpha" as some people mistakenly call it). This system was implemented in the Burning Crusade, but Blizzard has been using it heavily since Wrath of the Lich King. Basically, the game loads two textures for a single texture unit, allowing you to use one of them as an opacity mask to avoid hard cuts. You can make many awesome effects: (It's just a few planes with texture animation and a texture mask on top) It's an advanced model edit. We don't have the right tools and the documentation is almost non-existent. However the result is really satisfying and it's actually possible to do it by hand. Before starting, keep in mind that this system is not well documented. Most programs like Blender or PyModelEditor can break your model if you load them after applying this effect, so, leave the blend mode override for the last. TOOLS -PyModelEditor. -010editor + wow templates. -IMPORTANT: "Second UV channel creator" script. -My test model. THE TUTORIAL 1) Open your model with PyModelEditor: -Open your model in PyModelEditor and create a texture animation. You can follow my TUTORIAL. -Then, add the texture with the mask. In this case, we will use this one: World\TexAnimPlaneTest\BlendEffect.blp (included with my test model). It is VERY IMPORTANT that the texture with the mask is bellow the main texture. You can now save your model and close PyModelEditor. 2) Open your model with 010editor: -The main problem when trying to apply this effect is that your model must have a second UV channel. I made a script that clones the first UV channel into the second slot. Open your model in 010editor and run my "Second UV channel creator" script. If your model has blend mode overrides activated but doesn't have a second UV channel it will look invisible in-game. Note: make sure you are working on "OVR" mode before running the script. You can change it by using the Insert Key or by clicking INS/OVR in the status bar. -Change the renderflag that your model will use to additive alpha (4) or blend (2). Otherwise, the new blending mode won't work (will look black). 3) Now is when this starts to get complicated: -Go to the header and change the GLOBALFLAGS to 8. When you do this, the blend mode override activates. -Run the m2 template again and you should get an error message. Load the model anyway. Go to the bottom and a new block called "struct new_mapping" should appear: Go to the bottom of your file and write a line of "0". Copy the position of the line. In my case it's "1312". In "nAltMapping" write "2". In "ofsAltMapping" write the position of the line you just wrote: Run the m2 template once again and it should load correctly. Two new lines will appear under ofsAltMapping. Write "1" in the first one and "4" in the second: 4) Go to TexAnimLookup. There should be two TexAnimLookup: -1 and 0. The first one controls if the first texture moves. Replace -1 with 0 to make it animated. The second line controls if the mask texture moves. Replace 0 with -1: 5) Open your model SKIN with 010editor: -Go to texunits and change the D4 of the mesh with blend mode override to 2. This will force the game to load 2 textures for that tex unit. It will load the one referenced in the skin and the one bellow in the M2 list (texlookuptable). -In "texanimid" there should be a 0. You can now test the model in-game. It should look like this: As you can see, it uses the opacity of the second texture and it doesn't affect its texture animation. Without the blend mode override system it's impossible to make something like this. Feel free to play with the texture and create new effects. Remember that the mask texture must have an alpha channel or your model will look black. If you want to download the mask texture I used for THIS image, you can download it HERE. TL;DR VIDEO EXPLANATION If the GlobalFlag of your model is 8, the game triggers blend mode override for your model. You activate the blend mode override in the .skin file, by changing the D4 of your desired texunit to "2". When the GlobalFlag is 8, the way your M2 works changes completly. The order of your textures becomes relevant. The order of your textures will start to be read in pairs. Here is an example: Also, the order of "TexAnimLookup" should mirror the order of "TexLookupTable". The ID 0 of "TexAnimLookup" controls the texture animation of the texture with ID 0 in "TexLookupTable". I know it's kind of complicated, but play with it for a while and you will find out how it works. The values you write in nAltMapping (1; 4) are the renderflags of the blending mode. It means that the base texture will be applied as additive alpha (4) over the opacity map (1). If you think it looks too bright, change it to 1,1. MODELS WITHOUT HEADER SPACE Some models don't have space in their headers for the blend mode overrides extra block, therefore it overrides the model name data. What you can do in this case is opening the model in PyModelEditor and then saving it. Every time PyModelEditor saves a model it remakes the header from scratch and adds some free space for the extra header. However, the model name block is not necessary. You can just override it with the "new_mapping" block if needed and it won't cause damage to the model itself. UV CHANNELS If you want to create a custom second UV channel, download THIS SCRIPT I made. As you can see, it copies the UV channel 1 of a second model to the UV channel 2 of your first model: The idea is simple: make your model. Then clone it, modify its UV map in Blender and copy it to the second UV channel of the original model. This second uv channel method is used in many models, such as the fire coming out of Agrammar's eyes. You can map geometry into existing or smaller textures without having to create a new one. Here is an in-game example of a model with two different uv channels: After the script, the second uv channel is smaller and centered around the heart shape, but the first one along with its texture remains intact. The result is a bigger mask, leaving the original texture and UV untouched. IN CATA, MOP, WOD AND LEGION If you want to use this system in Cataclysm or Mists of Pandaria, the process is quite the same. Some steps are different. (Thanks to Soldan for giving me some information) -Instead of changing the GLOBALFLAGS to "8", you should put "128" ( or "0" if your model doesn't cast shadows). The "struct new_mapping" block won't appear, and it's not necessary, so you can skip the Step 3 completely. -Additionally open the .skin file, go to the texunit with blend mode overrides and add "16401" to the "order" field (aka "shader"). That number replaces the "struct new_mapping" block. If your model looks too dark, put "16404" instead, and it will look brighter.
-
Version 1.0.0
40 downloads
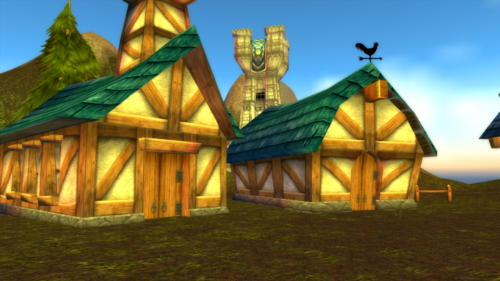
This is a recreation of the 2001 Alpha wow Barn seen in early trailers. It is an m2 and based on the Duskwood barn which is the same building. (The church in the screenshot is not included here) The barn is fully functional but like its Duskwood counterpart it lacks collision. Furthermore, the barn needs to be added to the gameobjectdisplayinfo to be spawnable. If used in noggit it works without any modification. The barn is for 3.3.5.-
- 1
-

-
- 100% accurate
- barn
- (and 1 more)
-
Version 1.0 alpha
564 downloads
A user-friendly GameMaster and Developer addon. Supports the latest TrinityCore Master, as well as (presumably) previous expansions. !Early Alpha! Inspired by an old Blizzcon video where parts of the GM interface were revealed (unfortunately, I have since been unable to find it again), and annoyed by the useful yet horrendously designed addons such as GMGenie and TrinityAdmin, I decided to make one of my own1. The end goal is a simplistic Warcraft-style interface for executing the commonly used GM commands. I am still quite far away from it. Features: Convenient toggle-style buttons for the on/off functionality Toggle-able and moveable panels for different utilities Sliders for semiautomatic selection of values Morph panel with dynamic preview -

Version 1.0.0
191 downloads
A project that I’ve worked on and off over the last 8 months, the original idea was to create a simple sandbox with basic networking for the original Alpha client (0.5.3) however, as per usual, it evolved and I’ve implemented (read: thrown together) the base of a few other systems. I’ve not worked on this for 3+ months so thought someone else might be interested in reviving this as I don't plan on continuing this project. A quick disclaimer: this was never intended to be a commercial project and therefore it is the definition of spaghetti code! I wouldn’t recommend trying to use this for a public server or to even work on the code; just simply as a reference. If I were to redo this I’d use one of the vanilla cores as a base and work back from that. Current status of features: Chat and emotes Chat channels not implemented Items Trading No enchanting through the chat window Groups Group loot not implemented Quests No ScriptDev equivalent so scripted quests won't work Not all of the correct quest filters are applied Issue with displaying quest objective count Instance portals Instancing itself is not implemented Gameobjects Only spawning (chests are animated though!) NPCs Vendors, talent trainers, bankers and skill trainers are working to some degree Basic faction implementation Friend/Ignore List Talent “tree” Spell effects not implemented Spell casting Spell effects not implemented but cast animations and pre cast checks are Creatures Can melee combat Looting works but couldn’t figure out how looting worked in terms that tagging mobs wasn’t a feature, should everyone have access to the dead mob’s loot? Movement isn’t correct AI not implemented Basic faction implementation Leveling Correct talent and skill points being applied as well as the animation Some things to note: I couldn’t find any reliable source to say if guilds even existed at this stage. The packets are there and the code is in the client but whether it was released I’m not sure so haven’t implemented it All settings are in the Globals.cs file including level cap I’ve used a Mangos 1.12.1 database as the backend so a lot of items/creatures/stats are wrong GM Commands include .additem <item number> .addskill <skillid> .setskill <skillid> <amount> <max amount> .kil .level <level> .money <copper amount> .setpower <amount> Saving is something I started working on but never really implemented The saving and database mechanic works around a custom ORM I built which is heavily reflection reliant Under the common project there is a file called structs.cs in the Constants folder. This is every struct I could extract from the client Username and password is in the wow.ses file inside the client directory; by default the server will create an account based on this information On my keyboard the '@' key brings up the client's debug console one very helpful command is "speed <amount>". The default being 6 and the max being ~50. Requirements: .Net 4.6.1 MySQL Installation: Client Download: ISO direct link Rar direct link Server: Extract the DBC files to a folder named “dbc” under the root directory MPQEdit works for this Unzip and run the SQL file in the Database.zip archive Inside the App.Config file is a MySQL connection string, change this to point to the above database If you’re running the compiled version the config is called WorldServer.exe.config Creature a shortcut to WoWClient.exe and add –uptodate to the end i.e. "E:\World of Warcraft Alpha 0.5.3\WoWClient.exe" –uptodate Continuation: As I said before, I never intended to release this or use it for an actual server this was just a project to explore the Alpha further than the original sandboxes. However if a team decides to work on this I’ll be more than happy to lend a hand or offer what information I’ve sourced. Source code can be found here: https://github.com/barncastle/Alpha-WoW The download link is a compiled version with DBCs