Search the Community
Showing results for tags 'Custom'.
Found 22 results
-
Version 1.0.0
274 downloads
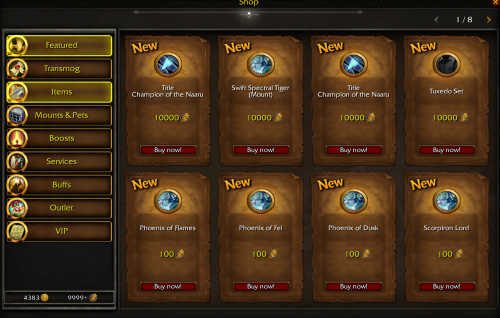
Hi everyone, I want to share with you a rather unique and working store for your server AzerothCore , TrinireCore and Mangos for 3.3.5a It works on Eluna written in Lua and uses the AIO module which can be downloaded from the link - LINK I will be glad to your likes and discussions Installation: DB flags and other config specific stuff: A special thanks : Foereaper -
Version 1.0.0
79 downloads
Hi! In collaboration with @kekie i've converted into game-ready models some of his human models (some are revamped parts of stormwind castle, etc.), all of them are WMO's except one that's an m2, I'll update this post whenever i do some of his other models (gotta finish some fountains, and small pieces that would all be m2), i'll update too in the future if he creates/finishes some other models. My part of the work has been finishing some unfinished model parts, some UV seams fixes, added blendmaps for the fake ambient occlusion, and create simple collisions, all of that in WoW Blender Studio ^^ All the models will be into these folders: WMO's: World\WMO\Kekie6 M2: World\Kekie6 If you find any error or thing to fix, comment, and i'll try to fix and update as fast as I can ^^ Have fun with 'em! -
Credits: @ stoneharry on discord What do you want from me now?? 1/6 I want you to have: wow.tools (getting your .blp and .m2 files) WDBX Editor -> WDBX Editor (editing your .dbc files to get your retroport working) MPQEditor -> MPQEditor (creating custom patches) Multi Converter -> Multi Converter (make your .m2 files work) 335 Server -> Server (i use this one) WOTLK Client -> just google it (preferably a FRESH client with NO other custom patches) TXID -> TXID (Fix our .m2 files) <- new Stoneharry's Spell Editor -> Spell Editor (Make the spell for our Wings) <- new HeidiSQL -> HeidiSQL (Edit spellvisualeffectname, because the spell editor has a bug that doesn't let you properly save it without having it changed in the Database first) <- new TXID -> TXID (Fix our .m2 files) <- new 010 Editor -> 010 Editor (Search in our .m2 file for possibly more .blp files it may need) <- new I hope you've seen my latest tutorial so you already know how your folder should look like. LETS DO THIS! 2/6 Open your wow.tools, select the box with the best ping, click on the world icon after that -> World of Warcraft 9.1.5 bla bla bla Now click on Models and search for "wings", we're going to use "capewingstiger". It's better to change the export folder to the one you were already using so it all goes in one place (don't worry, they will create subfolders). Use my settings and export as M2. Now head to your exported folder, go to spells and slap that capewingstiger.m2 into TXID about 15 times. Click Fix. Do the same now again, but use MultiConverter 3.3.0. Click Fix. Finding "missing" files from 010 Editor 3/6 Open capewingstiger.m2 with 010 Editor, press CTRL + F and search for blp. Make sure you're searching by text(t) (it's to the right of the search bar). Now, wow.tools exported everything but they are not in the same folder. for example: We're creating the Spell now 4/6 Enter your Database data, so it can connect to your Database. Select Import/Export and Import every file that begins with Spell After you're done with that, we make a "New Spell", we create it from an existing ID, i'm using the ID = 69188 since it attaches to your back already. My new SpellID is 90008 since i already have some custom spells. Now listen very closely, this is IMPORTANT. First go to Visual -> Kits & Effects and copy the first VisualKit Now head to Base and delete "Spell Visual 1" and turn it to a 0 Go to Visual -> Kits & Effects and Paste it there again. If the Paste option is greyed out, go to 69188 (rocket pack) and copy it from there. Should look like this, click on Confirm. (BEFORE GOING BACK CLICK ON "SAVE SPELL CHANGES") Now we go back to 69188 (rocket pack) and copy the lower part. Go into your new spell and Paste it in Visual Kit Effects & Attachments. Confirm this too! Our AttachmentID HAS TO BE 12 since it will be attaching it to our Back, where wings should go to, right? From there set all the things below to 0 or else you get a weird rotation, weird angles etc.. Weird Rotation: Save Spell Changes once again. Adjusting our Spell manually in HeidiSQL 5/6 In HeidiSQL open the "spellvisualeffectname" table and click on "Data". Click on "Show all" and scroll to the bottom. There should be a new Entry called "JetPack" or something else if you changed the name before. We change the name to XuenWing and the FilePath to spells\capewingstiger.mdx and change everything else like i did or else they be too small (for my taste). Go to your spell editor once again and click on "SAVE VISUAL MODIFICATIONS" they should all change to your manually edited entry. Save Spell Changes once more and click on Import/Export, select Export and wait for all Tables to load, just click Export checked to DBC. You can close the Spell Editor if you like to. Go into the folder of the Spell Editor and go inside of "Export". I sorted the files there by Date, so i know what i just changed, drag and drop these into your Server's DBC files. Make sure they are the right Time, mine are from yesterday, but i changed it today (12.02) and my server couldn't find the spell xD. Making a Client-Sided Patch in MPQEditor 6/6 Open MPQEditor and create a new MPQ, name it patch-4.mpq and hit next until you're in the MPQ. From there you create new Folders called "DBFilesClient"; "spells" ; "Creature" ; "item" Make sure they are separate folders, from there you drag and drop "all" the new dbc files from your Server into DBFilesClient. Put all the files from your exported spell into the spell folder, then the siberiantigergod and pandarenserpentgod into "Creature". then in the "item" folder create a subfolder called "objectcomponents" and put your shoulder folder in there. If it looks like this, you're good. (no need to restart server since we only edited our mpq and no .dbc files). Restart your Server, delete your Cache folder and type .cast 90009 (or the ID you used instead). If you followed my steps correctly, you should look like this! If it looks like this tho, you probably didn't add all the .blp files in your mpq patch. If anything is incomplete, just let me know over the Discord, my name there is Tyrallis too.
-
 Races custom (3.3.5) World of Warcraft: Wrath of the Lich King Worgen VoidElf Ogre DraeneiLightforged DemonHunter FelOrc Taunka Skeleton ForestTroll Pandaren Kultiran Dracthyr Vulpera Nagga Broken Tuskarr Arakoa Goblin Nightborne ZandalariTroll Eredar Saurok Murloc Furbolg Naga Ice Troll Core, dbc, lua scripts, patch, sql Features All races with their spells and animations 100% functional wow.exe custom 32 races limit unlocked Custom character creation interface. Custom character selection interface 20 selectable races (unlocked) Support Installation support included interface & races Contact Discord: unknow_kal
 -
How to produce a skybox – 3.3.5. Introduction What is a skybox? The answer is fairly simple, a skybox is a way to light up your zone in WoW. Aside from lightning up the environment, it also allows us to manipulate the way the sky looks (that is why it is called the skybox, but I consider this to be the 2nd order importance of it).The undeniable truth is, that it is really important to light up your zone properly, this produces a very good impression of your zone. However, this process can be quite tidious and certainly it is not easy to do. In this tutorial I will do my best to show you how to produce such a skybox! This is a super huge tutorial, I did my best to nail out the details, however, due to its size I am aware that there will be lots of minor spelling errors, grammar errors and such, please, do let me know about those, I will do my best to get those fixed! Also if you have any suggestions about the tutorial, I will welcome them! All files required for this tutorial can be downloaded via this link: https://mega.nz/file/yEhEnDoK#NQ-zIGSnHjVMXP2tjw_Jcjvqwnf1ZrTyY_5R8ZB9MPk You'll be better off with these files. When we get to DBC works in this tutorial it is good just to see how it works and once we are done, you can just go ahead and try changing some cells here and there. What software we need - MyDbcEditor – simple Dbc files editor - WDBX Editor – more advanced Dbc editor, you can use this instead of MyDbcEditor, however, we are going to use this one to produce BGR codes for our skybox (BGR is pretty much RGB in reverse order). Lets get all the files that we might need - From the latest client patch, we need to extract these: Light.dbc, LightParams.dbc, LightSkyBox.dbc, LightIntBands.dbc, LightFloatBands.dbc a Map.dbc. - In case you want to put there a skybox model to represent your sky, it is good to get your model in advance. The easiest way is just to take a model from higher expansions and downport it to 3.3.5.. It is certainly possible to produce your own 3D model for the skybox, but that is mostly a 3D modeling stuff, and we are not going concern ourselves about this. Basic information about light Dbc files First of all, lets make a little excursion into light Dbc files and lets try to understand what each file does. 1) Light.dbc –this perhaps the most important Dbc file we are going to work with today. This Dbc file is essential when defining a new skybox. In case you want to purely copy a already existing skybox, then this is the only Dbc file you need to edit. The structure is following: Collums: 1. Id of each skybox – not really interesting for us 2. Id of map – this Id comes from Map.Dbc, Id of map on which we want to place our skybox 3. X client side coordinate – X coor. For skybox placement, has to be multiplied by 36! 4. Z client side coordinate – Z coor. For skybox placement, has to be multiplied by 36! 5. Y client side coordinate – Y coor. For skybox placement, has to be multiplied by 36! 6. Inner radius of skybox – at this radius, the skybox won't overlap with other skyboxes, has to be multiplied by 36! 7. Outer radius of skybox – at this radius, the skybox will overlap with other skyboxes, has to be multiplied by 36! 8. Row Id from Lightparams.dbc, for normal weather 9. Row Id from Lightparams.dbc, for normal weather under water 10. Row Id from Lightparams.dbc, for rainy weather 11. Row Id from Lightparams.dbc, for rainy weather under water 12. Row Id from Lightparams.dbc, for spirit world 13. & other - Row Ids for other phases You can read more at: https://wowdev.wiki/DB/Light BEWARE! WoWDevWiki states the order of cooridinates in the standard way (x,y,z), but in fact it is switeched in case of Light.dbc (x,z,y) 2) LightParams.dbc – we have already touched this Dbc when talking about Light.dbc, each row in this Dbc file defines a unique lightning (skybox) setting, those settings can then be used in Light.dbc. Collums: 1. Defines Id of each lightning (skybox), this Id is then used in Light.dbc, it is also used as reference for rows in LightIntBand.dbc & LightFloatBand.dbc 2. Boolean value – Hightlight sky – not sure on this one 3. Id of skybox model (refence to row # in LightSkybox.dbc – we will also mention it later 4. Integer value, defines the clouds 5. Defines how much brightness/ fog will be added, float 0 - 1 6. Defines transparency of shallow River Water 7. Defines transparency of deep River Water 8. Defines transparency of shallow Ocean Water 9. Defines transparency of deep Ocean Water 10. Values from 0 -1, now sure on this one You can read more at: https://wowdev.wiki/DB/LightParams 3) LightIntBand.dbc – this Dbc file defines colours of our skybox, in fact, this is super important Dbc, because it really allows you to customise lightning in your zone. To edit this Dbc file we are going to use WDBX editor. The reason why is fairly simple, WDBX allows us to read and produce BGR codes (simillar to RGB). These BGR codes are then used by the skybox. Functionality of this file is following: for each Id (row) in LightParams.dbc there is 18 rows in LightIntBand.dbc, for instance, for row #1 in LightParams.dbc the first 18 rows in LightIntBand.dbc are bound to this LightParams.dbc row. Generally if we wanted to know what are the numbers of rows that correspond to our LightParams.dbc row the pattern is following: multiply the # of row in LightParams.dbc by 18, then we subtract 17 and the following 17 rows are bound to our original row in LightParams.dbc. Collums in each row: 1. Id of row –has to correspond to LightParams.dbc! 2. Integer value, defines how many lightning phases there are, max number is 15 3. - 18. Time values for each phases (if we wrote 2 in collum # 2 we need to fill in first 2 collums), time is give in half minutes. Say we wanted to put in there 7 am, value 840 corresponds to this time. 19. - 34. BGR codes,these define the colours of our skybox, they follow the same order as our time phases, in case we work with 2 phases, then we need to fill in only first 2 collumds, to produce these BGR codes we can use Colour function in WDBX editor. Each rows – below are described functionalities of each row's collums from 19. to 34. 1. Defines colour of general lightning 2. Defines colour of dispersed light 3. Colour of topmost part of sky 4. Colour of middle part of sky 5. Colour of sky going to the horizon 6. Colour of sky just above the horizion 7. Colour of the horizon 8. Colour of fog in the background (mountains and such) 9. ??? 10. Colour of sun, solar disk and sunrays 11. First colour of clouds 12. Second colour of clouds 13. Third colour of clouds 14. ??? 15. Colour of shallow Ocean Water 16. Colour of deep Ocean Water 17. Colour of shallow River Water 18. Colour of deep River Water You can read more at: https://wowdev.wiki/DB/LightIntBand 4) LightFloatBand.dbc – this Dbc has simillar structure to LightIntBand.dbc, however, this Dbc controls the amount of fox, its density, clouds density, and Moon shine. For every Id from LightParams.dbc there are 6 rows in LightFloatBand.dbc. This Dbc uses very same logic as LightIntBand.dbc, to get the 6 rows corresponding with your LightParams.dbc row you need to multiply the original # by 6 and subtract 5, to get your first row in LightParams.dbc. Collums in each row: 1. Row Id – has to correspond to Id row from (first row is LightParams.dbc * 6 - 5) 2. Integer value, defines how many phases of lightning there are, maximum is 15 3. - 18. Time values for each phase (if we wrote 2 in collum # 2 we need to fill in first 2 collums), time is give in half minutes. Say we wanted to put in there 7 am, value 840 corresponds to this time. Uses very same logic as LightIntBand.dbc 19. - 34. float values, in case we defined only 2 phases of lightning we need to fill in only first 2 collums. Functionality of collums in each row (collums 19. - 34, down below are rows) 1. Defines distance of fog multiplied by 36, from this distance on everything will be shrouded in fog 2. Fog density value, this says at which distance value the fog starts, float values from 0 – 0.999 3. Brightness of Sun and Moon when overlapped by clouds 4. Cloud density float value from 0 - 1 5. ??? 6. ??? You can read more at: https://wowdev.wiki/DB/LightFloatBand 5) LightSkybox.dbc – the simpliest Dbc of all, this file allows us to add skybox models, and edit their properties (such as transparency), we are not going to use this Dbc in our tutorial, but you can definetly go ahead and try experimenting with this one. Collums: 1. Defines Id of each skybox model, this Id is then used in LightParams.dbc 2. Path to our model: „Environments/Stars/[MODEL].mdx“ 3. Integer values flagy, defines properties of the model, such as transparency, 0 – skybox used animation based on time, 2 – shows Sun, Moon and clouds, skybox can be transparent, 4 – produces procedural mist. The most commonly used value is 2. You can read more at: https://wowdev.wiki/DB/LightSkybox Right now we have covered all the important things about the Dbc files. I admit there were lots of it, for sure you don't have to know all of it, but it is good to have a decent image of the structure. You can also read more at WoWDevWiki. Now we will proceed with the creation of a skybox. Creation of custom skybox: Now lets try to make use of our newly gained knowledge of Light Dbc files and lets try producing a custom WoW skybox at Hyjal! First of all, we need to get our client coordinates of the place – X=20540 Y= 11690 Z=1600 We can get these fairly easily in Noggit. First we insert a new row in LightParams.dbc – 954. For now we can leave this row be, or we can copy parameters of some other row. We will return to this later. Now we continue by adding a new row in Light.dbc –first of all lets write our X, Z,Y coordinates 3 multiplied by 36. Then we need to think of the inner and outer radius of our skybox. Lets say 1388 and 1666, once again we have to multiply these numbers by 36. After that we can insert the Id of our row from LightParams.dbc - 954. Now lets move to the harder part – LightIntBand.dbc and LightFloatBand.dbc. Lets continue with LightIntband.dbc. It is nessesary to open this Dbc files in WDBX editor. First we need to add 18 new lines starting with number: 954*18 – 17 down to number 954*18. To make things easier for us, it is always good to fill in all general datas to our newly added row, so that we can just copy it to all that will follow. All together we will be adding 3 phases of lightning – early morning – day – night. So we will use 3 collums of datas – se we will use 3 collums for time and 3 collums for data. First lets put in time value for morning phase, lets say we want to be from Midnight to 8:00, that means we put 960 (480 minutes * 2) into 3rd collum, day-time phase will be untill 19:00, that means 2280 will go into the 4th colum. Same datas can be used for following 17 rows, but it is not must do, you could have different number of phases for each setting. Right now we can move to BGR codes, lets get back to our first row #(954*18 – 17) – starting with collum #19 there are our collums with BGR codes. Lets say we want our skybox to have purple-blue-white like colour. So we generate our colours using Color function. Do 19. We proceed with filling in datas for morning, day and night, for each setting (yep, it is lots of work). At this point I highly recommend you using the Dbc files attached for this tutorial, makes everything much simplier, and to elevate your understanding of topic, just spend some time playing with the Dbcs. Now we are about to edit LightFloatBand.dbc. We no longer need to use WDBX editor, but you can surely use it if you feel comfortable in it. Once again we need to insert 6 new rows, once again their Ids need to correspond to our original Id in LightParams.dbc. The first row has to have Id: 954*6 - 6, 5 more rows follow. We want it to be pretty foggy in the morning,lets set the fog distance in collum #19 (1st row) to 9000 , for following collums lets set the value a bit higher. Simillarly we go on with the next row, this time we put in values from 0 – 1. Next row we fill in 0s or 1s, this one shouldn't really convern us, next row is about cloud density, lets say we want morning to be clouds, whereas nights should be clear (it is good to work with this row in case you don't want to add in skybox model, which is our case). That is all for LightFloatBand.dbc. Next Dbc is LightSkyBox.dbc, I don't want to put in any skybox model this time, so we are not going to use this Dbc. But feel free to give it a try yourself, it is a good starting exercise. If we had added in custom skybox model, we would have returned back to LightParams.dbc to fill in our skybox model row Id, defaulty this value in LightParams.dbc should be set to 0. (Collum 3) As of now we are done! Lets put all our edited Dbcs, blps and m2s into patch, and lets také a look what it looks like in-game We can see that our skybox works in-game! In case you have managed to get it all working, then well done! This is no easy task! If you find yourself running into any troubles with the skybox creation, or if you just want to discuss anything, feel free to ask! Krysík out
- 5 comments
-
- 14
-

-

-
Version 1.0
238 downloads
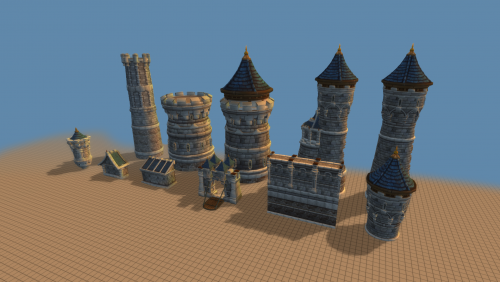
Lordaeron City model pack I'm sharing a model pack containing quite a few Lordaeron City themed models. Some models are simple edited cuts of the original Undercity wmo model, some models are custom made. Many of the models in the pack come from a joint collaboration of me and SinisterX (MTL). I share this pack in hope that Noggit lego-builders will make a great use of it. List of models: Wall - wmo Wall Tower - wmo Gate - wmo Arch Wall - wmo Arch Wall Gate - wmo Altar - wmo Astronomer's Tower Section - wmo City Tower - wmo City Road Ruins - wmo Lordaeron Barracks - wmo Lordaeron Small House - wmo Lordaeron Large House - wmo Lordaeron Chapel - wmo Lordaeron Stables - wmo Lordaeron Crypt - wmo Lordaeron Small Wall - m2 Lordaeron Fountain - m2 Lordaeron Statue01 (Terenas Menethil) - m2 Lordaeron Statue02 (Warrior) - m2 - Note that wmo models are lego friendly and m2 models can be put into their interior with exception of Barracks (they use human generic doodad pack). - Eventhough I tested the models in-game, there may be some model issues, if you find any such issue, do let me know please, I will do my very best to fix it! There goes link to the MTL Undercity series: -
Version 1.0
278 downloads
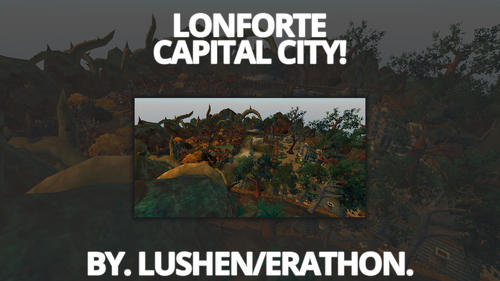
New custom Capital City: Lonforte! Hey Friends, today I would like to release my Map "Lonforte". It was built by me for my Server "Astoria". However, we decided to not use it and instead of letting it die in my Hard Drive, I decided to release it for you all! You are free to edit/change everything at the Map you want. You are allowed to use the Map for your Server/Project. You don't need to give credits, however its appreciated! - You are not allowed to sell the Map or any of the Parts of it! The Map has 3 main "Areas": War Craters - The Mid of the Map, where we planned Open World PvP between the Horde and Alliance. Lonforte: Disctrict of War - The Horde Capital City of the Map. Lonforte: Disctrict of Glory - The Alliance Capital City of the Map You need a Patch with all Draenor Objects/Textures. You can download "Zarkeven" ones. Download here: https://drive.google.com/file/d/1EeLtAGJ2DcoIDUjqJSAUXwynR9Pan4GS/view Be sure to place that into your WoW Data Folder (or your Noggit Workspace) Hope you Enjoy it! Showcase of the Map: -
Version 1.0.1
70 downloads
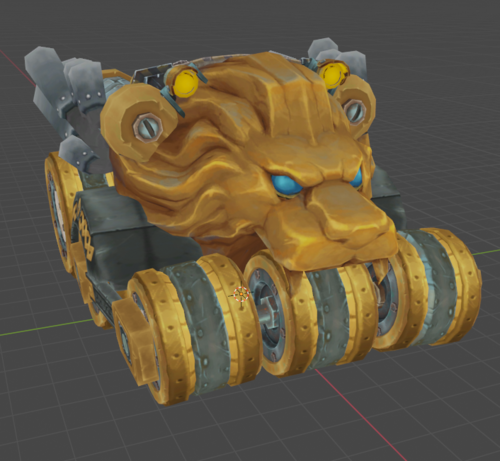
Hi, This is my first upload so bare with me! I made a custom Alliance style tank, inspired by the OG dwarven tank. It is made up from various assets from Warlords of Dreanor and Battle for azeroth. Nearly all used textures are either modified or crafted from scratch (mostly just modified though). All you need to do is download 'patch-J' and throw it into your Data folder (inside the world of warcraft 3.3.5a/Data). I want to give a special thankyou to loremaster, for explaining me how to convert my obj file to WMO and putting it into a patch Have fun and make sure to post pictures of the projects you use this asset for! -
Version 2.0
502 downloads
For more detailed description and screenshots visit this project's page: Patch contains always the newest version of all buildings, all textures used by them (I make copies of Blizzard textures, mainly because if anyone of you happens to have them already and have them edited in any way, the look of my models is preserved) and also all M2s used in doodad sets. Models are for 3.3.5a, so if you work on a newer expansion, WMOs should work just fine for you (if not, consult more experience devs in such matters than I am) and you might want and need to replace M2s in doodad sets by the ones which are actually for your expansion. I'm just a beginner at WMO creation, so you might want to edit these models a little bit. I'm always opened to suggestions and feedback (even while I also like to do things in my way, by my rules, following my opinions). You can use this for your personal projects, however, I'd like to ask you to add me into the list of contributors who helped you with creating that project. I probably shouldn't have to ask for this, it should be a matter of course, but... I think I don't have to finish this sentence. If you want to support me for making this, my Paypal account is jantoms@seznam.cz Version 1.0 - the first set of 4 buildings, which are quite small, have up to 2 rooms. No cellars, no doodad sets, have slightly bugged transparency at windows, those are reasons why they might be subject of change later. -
Version r001
409 downloads
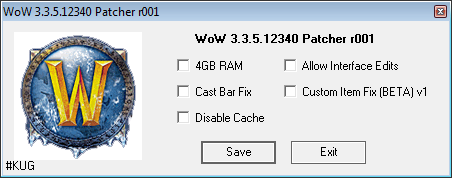
WoW 3.3.5.12340 Patcher This treat is for people who like to make custom items for 3.3.5. So I stumbled upon this reddit thread Reddit - [2.4.3] Patched Executable - Override item.dbc (Question Mark Icon fix) and figured if this was possible for 3.3.5 too. Well, 3.3.5 is quite different and it wasn't as simple as that, but after some tinkering I could made it work. When you patch your wow.exe with this, you don't need to make MPQ patches or edit the item.dbc at all. Just add the custom items you want to the "item_template" table in your SQL database and you're good to go. There are eight fields in Item.dbc: itemID, ItemClass, ItemSubClass, sound_override_subclassid, MaterialID, ItemDisplayInfo, InventorySlotID , SheathID And they all should work with the exception of Material. AFAIK it only affects which sound an item makes when moving it around in your inventory. So currently custom items won't have that sound. If anyone has expertise in reverse-engineering and can help me find the correct spot(s) for it, please PM me. I did some preliminary testing and everything has worked so far. But it still needs some more testing and I think it's 90-95% done. That's why I named it "Custom Item Fix (BETA) v1". I've tested this to work with the latest TrinityCore, but any core which supports custom items should work. If using TrinityCore make sure to set "DBC.EnforceItemAttributes = 0" in your worldserver.conf. If you find any bugs, post them and I will try hunting them down. TL;DR: Item.dbc patching is history Currently supported versions (r001): 3.3.5.12340 enUS Patcher supports Windows XP and newer. Currently it does not check whether you are on a 32-bit (x86) or a 64-bit (x64) system (forgot to do it, will include in r002) so if you are running a very old 32-bit system, do not use the "4GB RAM" patch. On the other hand, everyone on "new" (not from 20 years ago) systems should use "4GB RAM" patch. Patcher expects a clean and unmodified WoW.exe for it to work. This safeguard is in place so it can make sure the patch is applied correctly, as with binary patches it is absolutely necessary to have every byte in the right place to not have undefined behaviour or crashes. If you run into "invalid or corrupt wow.exe" error, it means your exe is modified and you need to use a clean wow.exe. You can find checksums for the unmodified wow binaries here: https://github.com/anzz1/wow-client-checksums The patcher was made mainly for this Custom Item Fix, but I decided to add some other popular patches for a clean all-in-one solution. "4GB RAM" - sets the "Large Address Aware" /LAA flag to allow a 32-bit WoW.exe to use 4GB of RAM instead of 2GB in 64-bit machines (More Info) "Allow Interface Edits" - allows editing interface files like the login screen "Cast Bar Fix" - shows cast bars on default nameplates "Disable Cache" - disables saving WDB cache Thanks: @BenjaminLSR and @rajkosto at the Rochenoire team for the original TBC version of the patch and with it pointing me to the right direction on where to start. Original creators of the "Allow Interface Edits" and "Cast Bar Fix" patches, whoever they are. Github Issue tracker: https://github.com/anzz1/WoWPatcher335/issues -
Want to buy some custom models we can port into a 3.3.5a client. These include things like a HD human arthas model, a night elf mage illidan model, undead Tirion, etc. Please message me on discord: Lambey#5307
-
Helo there is my project of custom guild system. It has guild reputation, new UI. Is not 100% done but so far there is it Youtube show off
- 5 replies
-
- 3
-
-
- guild_hall
- guild_system
- (and 2 more)
-

Version 1.0.0
164 downloads
Custom Old Stratholme - New Stratholme Wmo by MTL MEDIA / SinisterX INTRODUCTION Many in the WOW modding community are always looking for resources. One particular idea that is always roaming around is the idea to restore Lordaeron and it's cities. The second largest city being: Stratholme. In this mod I have taken "Caverns of Time - Old Stratholme" and modded for utility. The burning segment of the city was removed, new interiors were added: Chapel Interior Silver Hand Stronghold Interior City Tunnels Invisible walls removed Plague doodads removed ... and many other fixes to make the models usable. So if you are looking to restore Stratholme and be able to explore the city freely, then this is the resource for you. WHATS IN THE DOWNLOAD? Download contains a RAR file with an MPQ inside. The MPQ can be placed directly into the WOW DATA folder and named acording to each users patch load order. Alternatively the MPQ can be opened and resources can be extracted and used as need be. CREDIT Please include credit to MTL MEDIA or SinisterX. also included credit to Krysik for his (original Lordaeron Statues)-
- 8
-
-
-
- Custom
- Old Stratholme
- (and 2 more)
-
hi guys, i have these files ( m2 skin blp ) and edited my ItemDisplayInfo.Dbc but didnt work . pls help me :()
-
Hello, i'm here to sell my custom talent tree based on legion to wow 3.3.5a, you can easy edit level, spellsID, itemID to learn Spells, it requires eluna + AIO, selling it because it was of my old project, i'm not using it anymore You need any custom AIO system with own UI? Feel free to contact me and we can talk about it Prices, more informations through PM or discord Discord: Brøwller Bjørnson#8223 Original post: http://www.ac-web.org/forums/showthread.php?236531-WTS-Custom-Talent-tree-System-based-on-Legion-(3-3-5a)
-

Version 1.0.0
227 downloads
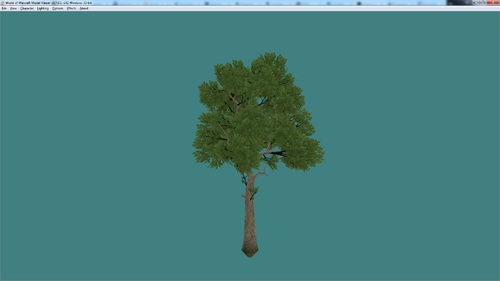
Hiya With this object set you get the original dark tree's from world of draenor's shadowmoon & two types of custom recolors I did. This will help spice of the tree scene and color dynamics in all your map creations & fantasies. In a later edition I might redo the brances since they do stand out a little bit more then I was going for. I also included the photoshop file for recoloring the texture. Be sure to drag the world folder into a custom patch before use and keep the folders & path intact. Happy Modding. Poisonleaf. -
Hello. I have made a custom continent behind the "blue wall" in eastern KIngdoms. Most of my friends can see the continent, but 1 friend cant. He plays on a MAC and its a wotlk server. Can someone maybe give a solution or explain to why its not working for him (NOTE: I'm not good at computers, I just love to have fun with noggit and etc.. =)))) ) Thanks again <3 Legit.
-
Hey, friends! Right now I'm working on new custom hairstyles! Which you can use in your personal project! The hairstyles will soon be available to download! Read more here https://reggie-art.tumblr.com
- 1 reply
-
- 6
-
-
- custom
- hairstyles
- (and 3 more)
-
Hi guys! Im new with this about modding and that stuff, so dont be surprise if I do fuck up extremely So, I compiled my server in trinitycore 3.3.5, and I tried to add some races, I follow this tutorial: http://emudevs.com/showthread.php/121-How-to-Custom-Races! But...I fail, in simples steps I did this: 1) I extract the required dbc files from C:\Trinity\Source\bin\Release\dbc and edit them in Talis 2) I extract the luas and xml from the enUS patches and edit them 3) I did the sql files and run them on Heidi on the world dbc 4) I created the patch, with the correct roots, I putted in wow and the edited dbc files in the C:\Trinity\Source\bin\Release\dbc back again 5) But! I run the server and I encounter this errors: https://gyazo.com/355dd392cd41d969671f0893e9fa4633 (It says: "Error creating character") and in the log of the server I found this: https://gyazo.com/aa86f8d7a60c8068d62c70c18f9f36b3 Also, when I start the server it just ignores all the sql I just putt (https://gyazo.com/55b2d5b6226854887065a82202f91b5e) Also, I created another sql for creating blood elves warrior, and that one for a reason work...while the others its just being ignored, and in the release directory I found a note "DBErrors" with this text: https://gyazo.com/a9a3b212ddb46bf21f75bc6721823b58 I have been alredy weeks with this going trough forums withouth any answer, if someone could help I would be really thankfull!
-
I made a model in blender, and tried to export it as wmo but all of my custom wmo-s crash, when i try to look at them. What could be the source of the problem? My export settings are simple, Vertex shading off since its an outdoor model, and thats all.
-
Ještě jedna věc, pokud textury convertnete do BLP za použití BLiPsteru se zaškrtnutým Clothing Texture, nepotřebujete ukládat textury v indexovaném módu, což dělá hodně věcí snazšími.
-
Hi bnet-dev ! I'm happy to share with you my knowledges about custom wmo's. After months of research and work, I've decided to make a tutorial for those who want to make their own wmo's. Special thanks to stan84, Supora, Waveworms (from Modcraft) and other peoples who helped me. Tools Used Summary Blender (you can use another 3D program)Notepad++010 editor010 editor templatesMODRChunk fileBLPconverterMirrorMachineMPQ editorWMO editor 1] Build the model before conversion2] Conversion of *.obj to *.wmo3] Add some doodads with WMOeditor4] Add a doodadset5] Additional informations2) Collisions3) Adding lights4) Coming soon and WIP...1) Use textures with transparency 1]Build the model before conversion To begin, you should know what you want to do. Do some research to find references that will help you give more "credibility" to your building. If you work in a particular architectural style, do not hesitate to find your inspiration from photography, if you are not in a specific style look anyway how Blizzard constructed houses, castles, and other buildings, so your model fits well and is coherent with its environment. The style of Blizzard is particular with its distortions and its side a little "used". I will not teach you how to make 3D models (I'm not a professional) but I will give you some tips to make it a little bit "optimized" for WoW. Here I am working on new models of houses for Kul Tiras. The island is in a Mediterranean / Tuscany theme, I did some research to see how the houses are built in these regions. To be sure that your home is at the right scale, you can use (and it is even advisable) the human model humanmalescale.m2 (because it is the "basic" scale in WoW), but open it large enough for passing a Tauren because it must be accessible to all races (a Tauren can enter in a human house without much problem because of its wide input) . The goal is that the player's camera could pass without taking the door jamb in the head. Don't forget to delete useless faces. For your model is well composed, it takes several geosets, the number varies depending on the number of "large parts" (as the capitals for example, who have a lot, by districts, house interiors, etc ...). For mine, I based on basic models of human houses, so it will be two geosets: inside and outside. For the instance of Gnomeregan the model has 73 geosets, because it's a big model. Each rooms and tunnels are geosets, sometimes divided into several parts. This palace (from Phantomx) has 63727 polygons and 58997 faces, it's a really huge model ingame, but it has only 24 geosets. In fact, the number of geosets really depends on how you organize your model, you can't have a wmo with only one geoset if it's a big piece because MirrorMachine can't convert it, you must divide it. To have a better render with light and shadows, remember to apply the smooth shading on the concerned parts (mainly for use on curved surfaces, straight walls don't necessarily need it). 2]Conversion of *.obj to *.wmo We will go to the conversion of the model. First, save it in .obj with the correct options as below. Once done, you have two files: your model in .obj and a .mtl file with informations about materials and textures. Open the .mtl file with your notepad, you will see the names of materials and patchs of the textures used. Simply change for that of .blp's in the mpq patch. Do it for each texture. (Insert the extension .blp instead of .jpg or .png it's not really important because the converter will add it automatically) When finished, save and close the .mtl and open MirrorMachine to convert your .obj in .wmo . Select "OBJ File " instead of "WMO v14 ", "Open File " to select and open your model, "Settings " to check that your options are much like on this screenshot. Click "Start Convertion", if your model is well built, it should work without problems. After conversion, you must have your wmo + his group files (the 00 .wmo) corresponding to geosets, so I have two in my case. To verify that the paths of the textures are good, open your wmo main file in 010 editor with wmo template. Here you can see that's good. Once everything is checked, you just have to put it in a patch and test it. Here is the result with a basic human house next for comparison. 3]Add some doodads with WMOeditor A house that's fine, but without furniture it's a little empty. We are going to fill it with WMOeditor and 010 editor. This time, open the group file in which you want to add doodads. Do CTRL+F to open the search window. In Type you must have "ASCII String (a)" and write "NBOM" in Value, then click on Find All. You will have a line including what you want that appears in the lower part of the window. Now do CTRL + I to open an insert window and look for the file containing the chunk for upgrading your sub -parts of wmo. If you compare with your original line and it has changed, then it is good. Save it. Repeat for each subpart involved in your wmo. Time to get serious and open WMO editor . At first it can be a little confusing to use because it displays models with a mirror effect. So once your wmo is opened, go to Root File to find the geosets that compose it. Click Edit to see their options, check "Has Doodads". Close the window and repeat on the other remaining. We can finally start placing those famous doodads. Now go to Doodad, in the bottom box is the doodadset that indicates how many m2 it has in total. Most houses have several doodadsets, but I have not figured out how to add a second, I'm working on it. Click on the [...] to open a window with a list of m2 similar to WoW Model Viewer. Once your selected an object, double-click on it, the window will then leave and you can place it in your wmo. Please note that the window does not close so far, it just comes up behind the first one. To navigate through the window of your building, the controls are the same as Noggit. Once you have decided where you want to place your object, place your cursor there and made CTRL + V to paste it. Here are the commands that allow you to move your objects as you like. Once you're done, save your work in File>Save. Your wmo completed will be saved in the WMO editor folder, in world. You just have to go in game to see the result. Congratulations, you are with a furnished house! 4]Add a doodadset 4) When you are finished with first doodadset you can add another one. For this you need only to edit the root_wmo file. So agan load it in 010 Editor. Go to MOHD and change the nSets to "2". Then ctrl+F NDOM and insert "this" just like we did earlier. But now it's time for some differences: when we added a new row for MODS chunk we need to change the name of our second doodadset like this: Then you need to change the index of first doodad used in this set to summ number of doodads used in previous sets(if you already have 2 doodadsets and wanted to add third you set this value to number of doodasds in first set + number of doodads in second. etc etc). In my case I've added only second set when first have only 9 doodads used. So I've change the "first doodad index(FDI)" to "9": That's it. You can save the file. Pack to mpq and load in WMOEditor. 5]Additional Informations 1) Use textures with transparency In your buildings, you may be asked to use textures with transparency as a grid for example. On blender, you can see the transparency with the rendered mode or other stuff like that, and the material clearly indicates that there is transparency. In game you will have opaque texture like all other. To set the transparency, we have to open the wmo in 010 editor and look in the MOMT chunk. In it, find your texture, at the line " UINT32 blendMode " you will see that the value is 0, it corresponds to the opaque mode, just put 1 in place in order to transparent mode. It's as simple as that. Save everything and voila. 2) Collisions Normally Mirror Machine manages well enough collisions each surface must have. If some places are little bullshit on collisions or you want to make collisions as Blizzard putting invisible walls to avoid falling into a ditch, or just block passages, well I'll tell you how. Here is an example of collisions that Blizzard has done in Gnomeregan, most of the time there are "boxes" goshawks some pipes or rounded elements such as barrels and also invisible walls to avoid falling in some holes. Collisions are in fact a double of the model but with the same number or sometimes fewer polygons and fully transparent. To do the same, you just have to use an invisible texture on your geoset. 3) Adding lights a) Manually with hex editor. You can look at the video made by PhilipTNG, it's pretty well explained. http://modcraft.superparanoid.de/viewtopic.php?f=20&t=927 Maybe later I'll add this part in text with images. 4) Coming soon and WIP... I wanted to wait a bit to publish my tutorial and put in more informations, but they need intensive work and research, so I'll put it later by updating this tutorial. What I want to show you: add music in the wmoadd footstep noises on the floor (wood, metal,...)add more lights (glowing windows,...)add liquids (water, lava, ...)And here are some WIP screens: I hope this has been helpful. Enjoy. (ps: sorry for my bad english if there are strange sentences)


.thumb.jpg.2d108c839dfec7aeaa21637072ad573f.jpg)
