Search the Community
Showing results for tags '010editor'.
Found 18 results
-

Version 1.6
1,832 downloads
There are two versions of WoW 335 executable here: WoWGen12.exe which - contains all features listed down below INCLUDING the hacky ones such as multi jump + ADDED NEW SCRIPT EDITS WoWGen11_WithoutHack.exe - contains all features listed down below EXCLUDING the hacky ones such as multi jump and EXCLUDING SCRIPT EDITS List of Features - Removed MD5 / SIG - Game version changed to my name initials and discord tag (A.S.E A2#6767) Release date to Dec 14 1337 for fun The real version of this file is still 3.3.5 - Druid on level 101+ get NO error when opening Base Stats - Every level 101+ can sit on barb Chair without Error - Does not Create CACHE file -Added LUA UNLOCKER you dont need to Manuly Unlock LUA functions via any 3rd party program this Exe has most of them unlocked by itself so far unlocked are (AcceptBattlefieldPort, SetCurrentTitle, UninviteUnit, ReloadUI, FocusUnit, ClearFocus, ... , InteractUnit, CastSpellByName, CastSpellByID, Movement functions ... , CancelLogout AttackTarget (error is still printed)) - Local Data Load directly from the folder no need to place them into the MPQ eg - M:\Client335\Data\DBFilesClient\ItemDisplayInfo.dbc is a viable path for wow.exe to read it in case wow.exe is in Client335 - Does not uses scan.dll to detect Cheat Engine at all - When you zoom close to your character it wont get transparent ========= ADDED IN SCRIPT ========= - Maximum Jump height - Maximum Climb Angle - Increased Far Clip ========= HACKY FEATURES========= - Allows Air Jumps at all time - You understand to every lang - /follow works simply on everysingle target no matter what target Due to popular demand im going to list of some Offsets for the edits I have done so you can do edits on your own or remove some unwanted functions List of functions that Warden scans for -
I said it in january, I did it in June but it's finally here ! In this tutorial I'll explain to you how to clone particles from a model to another one with the help of ParticleCloner, a tool made by Tigurius. This tool is old, so it doesn't work with Cata+ models since the structure of the m2's has changed. I didn't tried with spell models from Cata and up (only doodads or creatures), maybe it's different and it can work, but not sure. EDIT : it can load WoD or Legion models, but it's pretty random, if the models are similars it can work, sometimes not, just do some tests and try. What programs do we need ? - ParticleCloner - 010 editor (with m2 template) What's the process ? First, choose the particles you need in WowModelViewer on the model that you want. For this tuto I choose particles from the spell Arcane_form_precast.m2 to put on 2 models, one without bones or animations, and one with both : misc_2h_pitchfork_a_01.m2 and sheep.m2 . To make the transfert, select first the "destination" model, CTRL+left click to select the second "source" model and drag&drop on the application. (Always do backups if you did it in the wrong way, this program overwrite the original file ! ) When it's done, you'll have the particles at the same place of its original model. Now, you certainly want to move the particles to the right place. Open the m2 with 010editor and load the M2 Template. Go to the end of the file at the line " struct Particle ". You'll have all the informations you need, the attached bones, coordinates, etc... Particles have the bone from the original model, for a simple animation like this, there's only one bone. For this fire, there's three elements (flames, smoke and sparks), so there's 3 bones. I used it for a Sargeras model. You have to set the number of the bone where you want the particles to be. To move it to the right place, go to the " struct FloatVec3 pos " line. As you can see on the picture above, I modified the values on the x axis. You can change what you want to have the good coords. Just try and retry with the help of WMV to visualize the result. For the sheep, I set the particles on bone 3 who's attached to the head. This tool can copy the texture path of the BLPs used by the particles. But when you'll go ingame to see if it works, you'll have little cubes instead of the texture. WMV can load them, but not WoW. Why ? Because the tool does some mess too. In the " struct VModelFileName " 1 & 2, you have random symbols at " struct filename texture > string value " . Delete all and reload the template, or save and close the model. Do it for each particle in your model. And it's finally done ! Good job, you can manage particles ! PS : for unknown reasons, my fork is invisible ingame after I added the particles on it. Maybe because the model doesn't have enough "informations" in it because it's a little model, or because there's no bones in the original model. I don't know. Maybe one of you will find the solution ?
-
Version 1.0.0
78 downloads
Purpose: Recalculates all the model UIDs in given ADTs from a specified directory including its subfolders. It can start counting UIDs from the last max UID, which can be calculated with: ADTMaxModelUIDCalculator.1sc. Highly recommended to be used on the map before its release. Usage: Prerss F7 to run the script and select the directory. After the process is finished the last used UID will be displayed in the message box and copied to your system clipboard. CMD version: Not available, not planned. Requires: WoWADT.bt In order to run any of my scripts you need a new version of 010 editor binary templates which can be downloaded here. Produces model duplication on borders of ADTs! Duplicates can be removed using Noggit. -
Version 1.0.1
80 downloads
Purpose: Moves terrain and models along the Z-axis. Comes in handy when you need to merge two pieces of maps that have very big height difference. Usage: Prerss F7 to run the script. Enter the modifier value (negative or positive). Select ADTs files you want to raise or lower. CMD version: Not available, not planned. Requires: WoWADT.bt In order to run any of my scripts you need a new version of 010 editor binary templates which can be downloaded here. -
Hello guys! Im looking some guy which know work in 010Editor and he will be so kind to make some Tutorial HOW TO -> fix creatures from Cata/Wotlk/Legion.............. I mean fix Flying (Swinging wings) Just simply change this swiming animation to flying animation. It would be really nice, because im looking for it for so long, can't find nowhere any clue & nobody can help me with this. So if it will be possible, please just left reply in here or contact me on: adko.turac@gmail.com or im on discord as well : GoldenQo #5577 Thanks! Your GoldenQo
-

-
Version 1.0.0
65 downloads
Purpose: Edits MFBO data in ADT and sets it to given values. By default it is configured for removing MFBO related bugs. Though, values can be changed however you like. Usage: Run the script. Select files you want to edit. If you need some special MFBO data, change values in lines: 36 and 43. CMD version: Not available, coming soon. Requires: WoWADT.bt In order to run any of my scripts you need a new version of 010 editor binary templates which can be downloaded here. -
Anyone got a working one for all character animations ? Normally just removing the md21 chunk and using the cata template, but when i make changes to animations not all seem to work afterwards...
-
ok so I am working on a model that has some custom geosets. I would like to assign these geosets and get the geoset id so I can assign it in game. Note: this is for 7x. Im trying to port down a model to wod port it back up with 010 editor. Not sure if Im going about this all wrong, I thought I might have to get the model down to 3.3.5a so I can use pymodel editor but then I figured by the time I get it back to legion the model would be broken x) anyways if anyone knows how to get geoset ids or assign them in 010 editor please let me know
-
Version 1.0.1
115 downloads
Purpose: Clones collision from one .m2 model to another. Useful for making trees or similar objects that do not require collision identical to geometry. For example, make two versions of a tree model. One with leaves and one without leaves. Export all models to M2 using OBJtoM2 or any other existing converter/exporter and run the script. Also works for creating invisible walls and other collision things. Usage: Prerss F7 to run the script and select the source and destination file. Done. CMD version: Not available, not planned. Requires: "basics.h" and "M2TemplateLight.bt" (included in the release). In order to run any of my scripts you need a new version of 010 editor binary templates which can be downloaded here. -
Its not quitly tut or guide so i didnt place it to Tutorial section its more about tips that i want to get out of my head
-
Version 1.0.0
41 downloads
Purpose: Removes Z offsets of MCNKs in given ADT files. It does not add their values to actual heightmap data, so this can be used only for fixing offset-related bugs after the usage of tools like OBJtoADT or similar ones that work with heightmap data but does not pay attention to MCNK Z offset. Usage: Prerss F7 to run the script and select the ADT files to process. CMD version: To come. Requires: WoWADT.bt In order to run any of my scripts you need a new version of 010 editor binary templates which can be downloaded here. -
Version 1.0.0
42 downloads
Purpose: Calculates the heighest model UID from the given ADTs in the specified directory. Also processes files in subfolders. Usage: Prerss F7 to run the script and select the directory. The resulted value will be displayed in the message box and copied to your system clipboard. CMD version: Not available, not planned. Requires: WoWADT.bt In order to run any of my scripts you need a new version of 010 editor binary templates which can be downloaded here. -
Version 1.0.0
39 downloads
Purpose: Enables vertex shading (MOCV) in WoW .wmo model by setting an appropraite flag. Usage: Prerss F7 to run the script. Select group WMO files.. CMD version: Not available, not planned. Requires: WoWWMO.bt In order to run any of my scripts you need a new version of 010 editor binary templates which can be downloaded here. -
Version 1.0.0
68 downloads
Purpose: Modifies specified materials in a WMO to glow at night. Used for window and lantern textures mostly. Usage: Prerss F7 to run the script. Select root WMO files you want to modify. The script with show you windows with texture names. If the texture is meant to be lightened click "Yes", if the texture is meant to stay the same click "No" and if you want to stop the process click "Cancel". Note: all the data that has already been modifed will be saved when you cancel, the script just won't go futher. CMD version: Not available, not planned. Requires: WoWWMO.bt In order to run any of my scripts you need a new version of 010 editor binary templates which can be downloaded here. -
Hi, before asking this I've tried differents things with the help of the pxr but I can't find the right chunk to set the bones that I want to my particles. For this model, I have a simple fire effect from the booksonfire.m2 , I used the ParticlesCloner tool, now the fire works ingame, but it's on the bone number 0 (between the feet) and I want to move it to the head (bone 25). In the particles chunk, the effect is divided in 3 parts because it uses 3 textures, in the bone informations I have 1, 2 & 3. So I assume it's not the setting who manages the bone of the skeleton.
-
IntroductionDifficulty: Hard This tutorial is dedicated to explaining the basics of scripting in SweetScape 010 Editor. First of all, I want to say that I am not a programmer and the way I write the code may look weird to a person who knows more about programming. But following my way you can create useful script to automate many tasks you need to perform with World of Warcraft files. Important: You don't need any programming knowledge to start learning scripting in 010. I did not have any at first at all, so we are going to start from the real basics. 010 Editor uses two different filetypes to perform operations on the file. The first one is template (.bt) - it parses the file and gives us the structure with which we can work manually or within a script. Templates for most WoW files are already written and I am not going to teach you making them as I don't have that much of that knowledge myself. The next one is script (.1s) - scripts can be executed inside 010 editor, but unlike to templates, they can be excuted both on an open file or in a plain way (without a file opened). 010 Editor scripting uses a C-similar language. For experienced users: The language (1SC) used in 010 Editor scripting is indeed similar to C and shares most of the functions and syntax with it. Though, some parts of it are really weird and different from the the original C. Some functionality of C is not implemented. So, be careful and read the function reference. Learning basicsThis page contains a lot of useful information about this hex editor, though we are mostly interested in Function Reference part. Let's have a look at it. It contains a description of how you can use each available function. This is vitally important to read those definitions if you want to learn scripting. IO Functions are functions that take and return a value. They are used for most of our data operations including reading, writing and so on. Interface functions allow you to emulate the actions of a user such inside the editor, such as closing or saving the file, opening files, moving cursor and so on. Math functions are obviously doing some mathematical calculations. I have not used functions from other pages but I guess they can be useful too. So, the basic idea is to execute a template on a file, get the structure and read or write some values to it. Writing your first scriptSo, when I was learning 010 editor scripting what I started from was pure practice. Just trial and error method, no programming knowledge at all (I did not even have programming at school, as most people do). And I suggest you doing exactly the same thing because it is easier to learn by making something useful rather than reading boring theory written by some noob who obviously codes wrong in a non-professional way, but yet working. The first thing that we are going to do is a collision cloner script. The purpose of it is to copy collision from one .m2 model to another. Some of you may ask: "What's the use of it? Let's make something really useful!". Well, basically when you create custom models, sometimes you need to have some parts of model collidable and some not. The convertion software always sets collision to the entire model, which is not what we want. So we can create two version of a tree - with leaves and without leaves. Then we convert both to .m2 model and copy collision from the one without leaves to the one with leaves. So, we get a collideable trunk and leaves that you can pass through. Anyway, let's get started. Step 1. Investigating the dataFirst of all, when we know what we want to do we need to find out what data is reponsible for handling collision. The best source of information for that kind of things is our Wiki (the link is in the upper menu of the website). But in case of collision, everything is rather simple. So, first thing that I want you to do is to create an empty script file and open some .m2 model in 010 Editor. Apply the M2Template1.bt script on it. We get a dropdown with the structure: This is a shortened version because the list is too long to display. M2 file structure is based on offsets (starts with ofs). Those are values that are always located by the same adress no matter what model it is. They identify the adress of an actual block of data in the file. So, you can just read them and know where the actual data is written. The lines starting with (n) identify the amount of elements used in the data array. They are also static and are always located on the same adress. And everything else is structures. The client finds out how to read the file by reading ofs's and n's and finding out where the block of data is located in the file. There is no matter what the order of the data structure is when the static part is over. So, what we are going to do is: Read offsets for collision.Read the amount of data elements.Find and read the collision data depending on the given values.Copy it to the end of the target file.Change offsets and n-values to the proper values corresponding to the new data.The old data block will remain the file, but the client won't read that part as offsets won't point to that adress anymore. The last thing you need to do in this step is: Right click on the structure - Coloumn Display Format - Name. It will save you a lot of time in the future steps, just believe me. Step 2. Writing the scriptI will paste here the entire script and write comments to it explaining how things work. So, by reading attentively this script and trying to understand what it does you can learn the basics of scripting. Basically, it covers most operations that we need to perform on WoW files. Let's also look into some other useful things now. Useful patternsHere I will provide a set of code snippets that can be used for constructing your script in no time, not depending on the purpose of it. I will post plain code here and explain what each of them does and how it is better to use it. Snippet 1. Batch file processing.One of the most useful things in 010 editor scripting. It allows you to execute your script on multiple files at once. There are quite a few ways to do it such as CMD execution, but we will talk about that a bit later. Example script. Sets the MFBO chunk of an .adt to a given values: CMD ProcessingYou can also do perfectly without this snippet by using CMD way of execution. It has a lot of advantages comparing to what I just wrote. Though, ,y snippet allows you to select multiple files no matter what they are. You manually select what you want to do processing on from the folder. CMD way is very automatic and only works on a particular file extension. Create a script file that contains only processing, no InputOpenFileName and so on. Just plain processing. Create a .cmd text file containing this: Now you can save it an launch from the folder. You can also change the arguments. @ECHO OFF disables the CMD black window. /r enables processing in all the subfolders. for %%x in (*WMO) do 010editor "%%x" -script:"C:\Users\Skarn\Desktop\wmo-converter.1sc" executes the script on all the .WMO files. -nowarnings disables the warning window. -noui allows you to execute the script in a noui silent way, so you can process thousands of files and blinking windows won't bother you. Snippet 2. Coming soon!
-
- 5
-

-
- scripts
- hex-editing
- (and 1 more)
-
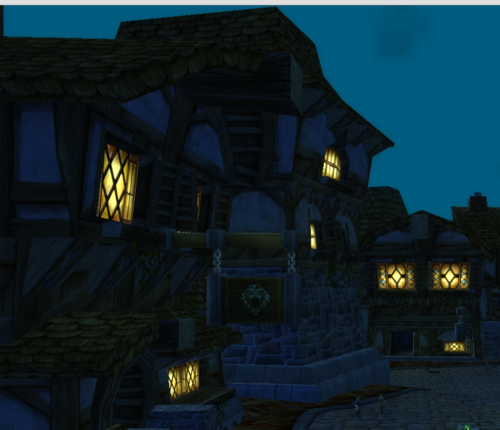
Hi bnet-dev ! I'm happy to share with you my knowledges about custom wmo's. After months of research and work, I've decided to make a tutorial for those who want to make their own wmo's. Special thanks to stan84, Supora, Waveworms (from Modcraft) and other peoples who helped me. Tools Used Summary Blender (you can use another 3D program)Notepad++010 editor010 editor templatesMODRChunk fileBLPconverterMirrorMachineMPQ editorWMO editor 1] Build the model before conversion2] Conversion of *.obj to *.wmo3] Add some doodads with WMOeditor4] Add a doodadset5] Additional informations2) Collisions3) Adding lights4) Coming soon and WIP...1) Use textures with transparency 1]Build the model before conversion To begin, you should know what you want to do. Do some research to find references that will help you give more "credibility" to your building. If you work in a particular architectural style, do not hesitate to find your inspiration from photography, if you are not in a specific style look anyway how Blizzard constructed houses, castles, and other buildings, so your model fits well and is coherent with its environment. The style of Blizzard is particular with its distortions and its side a little "used". I will not teach you how to make 3D models (I'm not a professional) but I will give you some tips to make it a little bit "optimized" for WoW. Here I am working on new models of houses for Kul Tiras. The island is in a Mediterranean / Tuscany theme, I did some research to see how the houses are built in these regions. To be sure that your home is at the right scale, you can use (and it is even advisable) the human model humanmalescale.m2 (because it is the "basic" scale in WoW), but open it large enough for passing a Tauren because it must be accessible to all races (a Tauren can enter in a human house without much problem because of its wide input) . The goal is that the player's camera could pass without taking the door jamb in the head. Don't forget to delete useless faces. For your model is well composed, it takes several geosets, the number varies depending on the number of "large parts" (as the capitals for example, who have a lot, by districts, house interiors, etc ...). For mine, I based on basic models of human houses, so it will be two geosets: inside and outside. For the instance of Gnomeregan the model has 73 geosets, because it's a big model. Each rooms and tunnels are geosets, sometimes divided into several parts. This palace (from Phantomx) has 63727 polygons and 58997 faces, it's a really huge model ingame, but it has only 24 geosets. In fact, the number of geosets really depends on how you organize your model, you can't have a wmo with only one geoset if it's a big piece because MirrorMachine can't convert it, you must divide it. To have a better render with light and shadows, remember to apply the smooth shading on the concerned parts (mainly for use on curved surfaces, straight walls don't necessarily need it). 2]Conversion of *.obj to *.wmo We will go to the conversion of the model. First, save it in .obj with the correct options as below. Once done, you have two files: your model in .obj and a .mtl file with informations about materials and textures. Open the .mtl file with your notepad, you will see the names of materials and patchs of the textures used. Simply change for that of .blp's in the mpq patch. Do it for each texture. (Insert the extension .blp instead of .jpg or .png it's not really important because the converter will add it automatically) When finished, save and close the .mtl and open MirrorMachine to convert your .obj in .wmo . Select "OBJ File " instead of "WMO v14 ", "Open File " to select and open your model, "Settings " to check that your options are much like on this screenshot. Click "Start Convertion", if your model is well built, it should work without problems. After conversion, you must have your wmo + his group files (the 00 .wmo) corresponding to geosets, so I have two in my case. To verify that the paths of the textures are good, open your wmo main file in 010 editor with wmo template. Here you can see that's good. Once everything is checked, you just have to put it in a patch and test it. Here is the result with a basic human house next for comparison. 3]Add some doodads with WMOeditor A house that's fine, but without furniture it's a little empty. We are going to fill it with WMOeditor and 010 editor. This time, open the group file in which you want to add doodads. Do CTRL+F to open the search window. In Type you must have "ASCII String (a)" and write "NBOM" in Value, then click on Find All. You will have a line including what you want that appears in the lower part of the window. Now do CTRL + I to open an insert window and look for the file containing the chunk for upgrading your sub -parts of wmo. If you compare with your original line and it has changed, then it is good. Save it. Repeat for each subpart involved in your wmo. Time to get serious and open WMO editor . At first it can be a little confusing to use because it displays models with a mirror effect. So once your wmo is opened, go to Root File to find the geosets that compose it. Click Edit to see their options, check "Has Doodads". Close the window and repeat on the other remaining. We can finally start placing those famous doodads. Now go to Doodad, in the bottom box is the doodadset that indicates how many m2 it has in total. Most houses have several doodadsets, but I have not figured out how to add a second, I'm working on it. Click on the [...] to open a window with a list of m2 similar to WoW Model Viewer. Once your selected an object, double-click on it, the window will then leave and you can place it in your wmo. Please note that the window does not close so far, it just comes up behind the first one. To navigate through the window of your building, the controls are the same as Noggit. Once you have decided where you want to place your object, place your cursor there and made CTRL + V to paste it. Here are the commands that allow you to move your objects as you like. Once you're done, save your work in File>Save. Your wmo completed will be saved in the WMO editor folder, in world. You just have to go in game to see the result. Congratulations, you are with a furnished house! 4]Add a doodadset 4) When you are finished with first doodadset you can add another one. For this you need only to edit the root_wmo file. So agan load it in 010 Editor. Go to MOHD and change the nSets to "2". Then ctrl+F NDOM and insert "this" just like we did earlier. But now it's time for some differences: when we added a new row for MODS chunk we need to change the name of our second doodadset like this: Then you need to change the index of first doodad used in this set to summ number of doodads used in previous sets(if you already have 2 doodadsets and wanted to add third you set this value to number of doodasds in first set + number of doodads in second. etc etc). In my case I've added only second set when first have only 9 doodads used. So I've change the "first doodad index(FDI)" to "9": That's it. You can save the file. Pack to mpq and load in WMOEditor. 5]Additional Informations 1) Use textures with transparency In your buildings, you may be asked to use textures with transparency as a grid for example. On blender, you can see the transparency with the rendered mode or other stuff like that, and the material clearly indicates that there is transparency. In game you will have opaque texture like all other. To set the transparency, we have to open the wmo in 010 editor and look in the MOMT chunk. In it, find your texture, at the line " UINT32 blendMode " you will see that the value is 0, it corresponds to the opaque mode, just put 1 in place in order to transparent mode. It's as simple as that. Save everything and voila. 2) Collisions Normally Mirror Machine manages well enough collisions each surface must have. If some places are little bullshit on collisions or you want to make collisions as Blizzard putting invisible walls to avoid falling into a ditch, or just block passages, well I'll tell you how. Here is an example of collisions that Blizzard has done in Gnomeregan, most of the time there are "boxes" goshawks some pipes or rounded elements such as barrels and also invisible walls to avoid falling in some holes. Collisions are in fact a double of the model but with the same number or sometimes fewer polygons and fully transparent. To do the same, you just have to use an invisible texture on your geoset. 3) Adding lights a) Manually with hex editor. You can look at the video made by PhilipTNG, it's pretty well explained. http://modcraft.superparanoid.de/viewtopic.php?f=20&t=927 Maybe later I'll add this part in text with images. 4) Coming soon and WIP... I wanted to wait a bit to publish my tutorial and put in more informations, but they need intensive work and research, so I'll put it later by updating this tutorial. What I want to show you: add music in the wmoadd footstep noises on the floor (wood, metal,...)add more lights (glowing windows,...)add liquids (water, lava, ...)And here are some WIP screens: I hope this has been helpful. Enjoy. (ps: sorry for my bad english if there are strange sentences)