Search the Community
Showing results for tags 'Wmo'.
Found 80 results
-
Version 1.0.0
83 downloads
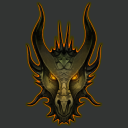
Hello everyone! This is a little WMO pack which contains Naga buildings from 8.2 patch (without the exterior of Eternal Palace and its entrance). Unfortunately, there're not doodads because they were "retroported" by means of Marlamin OBJ Exporter (WMO —> OBJ —> WMO). I hope you'll be pleased at least by this pack. -
Version 1.0.0
1,120 downloads
Most WMOs from cata to BFA ported to 3.3.5a working on WMV version 7.0.1 r206 32bit: https://storage.googleapis.com/google-code-archive-downloads/v2/code.google.com/wowmodelviewer/WMV_Installer_v0701_r206_Win32.msi 64bit: https://storage.googleapis.com/google-code-archive-downloads/v2/code.google.com/wowmodelviewer/WMV_Installer_v0701_r206_Win64.msi Due to IRL problems, this project has been discontinued. There will be no more updates to this unless needed. To report a WMO that isnt working, please send to this email address: wmonowork@gmail.com subject: modelname (ex.6or_garrisontower01.wmo) in message: explain what happens when you try to load it into WMV, noggit, or in-game patch m- Cataclysm patch n- Mists of Pandaria patch o- Warlords of Draenor patch p- Legion patch q- Battle for Azeroth- 6 comments
-
- 10
-

-

-
Once you have imported a model and while editing it, you will see exactly how it will look once added to the game, thanks to the addon's automatic generation of materials for blizzlike rendering. Here is a comparison of the same WMO imported with the addon (left) and as an .obj via WMV (right): The addon supports both the internal Blender renderer (soon to become Eevee renderer) and Cycles renderer, with materials generated for the one you import the model in. You can change the renderer and re-generate materials at any time. The addon provides you with a vast array of tools to show, hide, and edit any aspect of the WMO. You can change the existing mesh, create new rooms with portals between them, move doodads around, and light everything up! In addition to manual editing, many tasks can be auto-performed globally, for example ambient lighting: Doodads, too, can be lightmapped manually or auto-aligned to fit the surroundings:
-
The addon allows you to import any M2 or WMO without conversion: either an extracted one from somewhere on your computer or directly from WoW Model Viewer. In both cases, the addon will do its best to find the required textures, doodads, etc. and import them automatically, unless you tell it otherwise.
-

wotlk Looking for ergonomic 3.3.5 .WMO and .M2 model viewer
WithinAmnesia posted a topic in Modeling
Hello I am looking for an ergonomic (simple to use) .WMO and .M2 viewer like WoW Model Viewer but it will not crash on a 3.3.5. World of Warcraft client. I am looking for a simple model viewer that does not need to be compiled and other complex requirements. Ideally the model viewer just asks for data location directories and comes with an .exe file included. Also I am using windows if that helps; are there any suggestions? I know that there was this really good model viewer I used in the past that had 3.3.5. support with .WMO and .M2 support but my older computer is dead and I forgot which program it was. I obtained it from one of the helpful community members here I think? -
Welcome to this quick guide. ** DISCLAIMER ** This will NOT downport character models Since many of you have been PMing me desperately asking : "How do you downport this shit man??" Here you go. Enjoy. Tools needed: CascExplorer Adspartan's Multiconverter BfA Listfile (put this in your CascExplorer folder) Thanks to Wungasaurus for the correct listfile ------------------------------------------------------- Enjoy your new models, homeboy
-
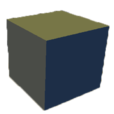
THE ADDON IS OUT OF DATE! THE UPDATE WILL COME ~ ON SUMMER Introduction Hello, Model Changing Network. In this tutorial I want to show you how to edit and create WMO models using Blender WMO addon. Actually, this addon is much more than a usual import/export Blender plugin. Besides core functionality of importing and saving edited WMOs, this addon is also a powerful editor supporting nearly all (you still cannot create working transport objects with it) features of World of Warcraft World Model Object (WMO) files. What is World Model Object? World Model Object or just a WMO is a special compound 3D structure used in the game World of Warcraft for making buildings, dungeons and other big complicated 3D objects. It does not only contain traditional 3D model parts as geometry, UV maps, materials and so on; but it does also support features like liquids, complex lighting system, portal culling system and much more. Donation The provided software is available completely free of charge, however, if you want to support the development, here is Skarn's PayPal account. He is also working on a similar Blender plugin for .M2 models. So, by helping him, you can speed up the development of two tools at once. Currently supported features: Geometry Materials Lightmaps Double-UVs Collision and more. Portals Liquids Lights Fogs Doodad Sets Various WMO settings Requirements Blender WMO addon WoW Model Viewer BLPConverter Part 1. Installing addon and configuring your Blender Download and install the latest Blender version (2.78c or newer). Download WMO addon and place it into addons folder inside of your Blender folder: blender\x.xx\scripts\addons\io_scene_wmo\ Download WoW Addon Pack which contains WoW Model Viewer and BLPConverter and place it into your WoW Tools folder: In this tutorial I will use this path: D:\Work\WoWTools\ Step 1. Enable the WMO addon Step 2. Fill your tools paths Always click on Save User Settings button after editing the addon preferences Now you are able to export and import .wmo models right from your Blender Part 2. Basics and peculiarities of WMO editing using Blender This addon is designed in quite a special way and it would probably be better to import some existing .WMO model from WoW to learn how to operate it because the WMO from WoW will be already configured correctly by itself. For this purpose, I am going to use a small human farm. In this tutorial I won't explain how to create models in Blender. I will just tell you how to make them work as a .wmo in the game. I will cover the unusual parts that are different from the normal Blender usage. Quick WMO Tab This tab is the easiest way to edit your model. There are few main sections: Display - used for displaying different object types on the scene Add to scene - used for adding different object types to the scene Game data - used for loading your WoW MPQ patches from your data folder (Part 1 Step 2) Selected - used for converting selected objects and materials Apply - used for applying different actions to objects Doodads - used for doing different actions with the doodads on the scene Material This addon uses his own special material properties called WoW Material which are bound to Blender material. There you can specify the texture you apply to the model by setting a path to it and a few other less important settings: Shader used for producing special WoW render effects Terrain Type used for producing footsteps sounds and footprints Blending used to control texture blending on rendering Texture 1 diffuse texture (object) Texture 2 environment texture (blending) Flags used for defining special render options for the texture Emissive Color the color of the object when no light falls on it Diffuse Color base color of the object Flags Unlit disable world lighting effect Unfogged disable world fog effect TwoSided render from both sides Exterior light ignore local WMO lighting, use world lighting instead NightGlow used for windows to glow at nighttime Window has no description yet, used for windows In order to assign the texture to the geometry you need to assign a usual (Blender) material to it Go to material properties, find a tab called WoW Material and specify the required settings there: When you assign and tweak all of them, the textures will be visible in-game Collision In order to create collision for a model you need to go to Quick WMO Tab and click on Quick Collision: That's all! One button click - pretty easy, isn't it? WMO groups World of Warcraft WMO supports two group types - indoor and outdoor. Outdoor is used for exterior objects and is influenced by the zone lighting. Indoor is used for interior models, interior parts of models. It is not getting influenced by the external light. If you are planning to use indoor groups in your scene you will have to create portals for them. I will explain how to make them later. For setting group types, select your objects and click to Convert selected --> To WMO group and also specify a type of the group: In the same preference tab you can also see various settings: Name - Object's name is saved into the files and is only used for development purposes, for example, when you inspect your model using a 010 editor. Please do not name as "Antiportal", an internally reserved name that actually makes sense for the game. Description - group description, which is also used only for development purposes. Name it whatever you want or leave blank. Place Type - select type for your group: indoor or outdoor. Flags - enable/disable different flags for your model. You can always see the description of each flag when you hover it: DBC GroupID - connected with AreaID for WMO. Used to detect indoor groups for example, so the server can dismount you when you enter them. LiquidType - fills this WMO group with selected liquid. Portals Portals are used to connect indoor groups to outdoor groups or other indoor groups. If the portal is not set but the indoor group is used, you will have the indoor group rendered only while standing in it, everything else will look like emptiness. A portal is a plane that, in most cases, contains only 4 vertices and one face. Portals are created as separate objects (you can see them in the outliner if you import some original WMO like I did with human farm). If the portal is bugged in-game: Step 1. Select your portals Step 2. Use Bake portal relations button Step 3. Use Set portal direction button with Auto option selected If it is still bugged, try one either Positive or Negative unless the portal starts working. If it does not help, make sure that relation baking algorithm has bound the correct WMO groups to the portal object. Creating custom portal geometry There is nothing complicated in making custom portal geometry. Though, remember that it should be precisely on the edges that connected groups share between each other. So, in order to create a correct plane for a custom portal select one of the groups. Simply select 4 corner vertices and press F. It will generate a plain between them. Then select this plane and press P. In the opened menu choose By selection. It will detach the plane to a separate an object, so that you can fill in the settings. If you move the portal from that point it will be bugged in-game on camera rotation. Be careful with that. Step 1. Convert your plane to WMO Portal: Step 2. Bake portal relations. Step 3. Set portal Auto direction if set otherwise. Done! Much easier than in previous addon version. Just make your plane and click on these 3 buttons. Easy peasy Vertex color You can paint vertex colors on WMO groups. It is used for lighting and coloring particular places of a group. For doing that switch to Vertex paint mode. You can learn vertex painting features by practice or by using some Blender tutorials or documentation. Don't forget to enable Vertex color flag in WoW WMO Group tab else the color won't be seen in game. The flag is forced on export for indoor groups, though. For filling, pick up a color and press Shift + K Better than Photoshop, right? Fog The fog effect mimics the scattering of light in a fog. Objects in the distance become less contrasting and acquire a fog color. In night scenes fog is usually dark, in daytime - whitish or slightly bluish, just like real fog. In Blender WoW Fog looks like transparent sphere. In order to add a fog, you just need to click on Add Fog button in Quick WMO Tab: Fog has some simple options to work with: Ignore Radius (probably) makes fog global Inner Radius a radius of fog starting to fade Farclip anything further away from the eye than the far clipping distance isn't displayed (it's too far away) Nearclip anything closer to the eye than the near clipping distance isn't displayed (it's too close) Color fog color Underwater farclip same as Farclip, but under the water Underwater nearclip same as Nearclip, but under the water Underwater Color fog color under the water One-button-action. Again?! Water Water - used to make WoW liquid in your model. In order to add water you need to click on Add Water button in Quick WMO tab: You can't scale water! Just edit your water size (subdivisions) in left bottom corner when you're creating it. WoW Liquid group has own options: LiquidType - type of liquid in WoW. There are lots of variants to work with: Color - water color WMO Group - parent group for this liquid. Use an eyedropper or type the WMO group name to select a parent object. Flags If you switch to vertex paint mode when the water plane is selected, you will be able to set flags to quads that control the rendering of the water. We do not yet know what most of them means, so if you figure that out, please tell Skarn, he will rename the buttons. There is an easy way to work with water. Just tweak your options to get a perfect result. Scale This function is used to add a visual placeholder for taking some information about your model proportion. Just click on the button: You can edit your Scale Type in the left bottom corner when you're creating it: Batch Types. Lightmaps. Blendmaps. Second UV Batches are groups of faces which are used to accelerate rendering. World of Warcraft WMO supports two batch types - Batch A and Batch B. Batches are usually used only for interior groups. Batch A is influenced by the outdoor (zone) lighting. Batch B is not getting influenced by the external light from outdoor groups. Lightmaps - used to accelerate light rendering. Normally used in Batches A in order to blend the geometry with world lighting. See the entrance of the human farm in order to see how it works. Blendmaps - used to accelerate texture blending. If your material is using one of the TwoLayer shaders, you enter a second environment texture path, which will blend with the diffuse texture according to lightmap values. SecondUV - used to define the UV map for double texture materials. Just create a new UVmap, edit it and bind to this property. Step 1. Enable Edit Mode Step 2. Assign faces to vertex group Step 3. Select your group in batch vertex group In order to work with Lightmaps: Step 1. Create vertex group, enable Weight Paint Mode and do your edits Step 2. Select your group in Lightmap vertex group Weight Paint palette: Weight = 1 - red color. Maximum effect Weight = 0 - blue color. Nothing happens. You can learn weight painting features by practice or by using some Blender tutorials or documentation. Blendmaps are painted by the same way. Just try it by yourself. Not so long for making your model looks realistic. Just keep improving your skills at it. Doodads and models importing This function is used to import WoW models (.M2 and .WMO) directly from WoW Model Viewer in a very fast way. Add WMO - used to import the last selected .WMO model from WoW Model Viewer. Imported model will be just a usual Blender object to be edited. Add M2 - used to import last selected .M2 model from WoW Model Viewer. This model is just a visual placeholder for real WoW model. Imported model will have the property WoW Doodad assigned. WoW Doodad has own options: Path - real WoW model path in your patch Color - Doodad color (overlayed effect) Accept Projected Texture - keep textures with enabled Projected Textures in WoW game options Adjust lighting - applying local doodad lighting For WoW Doodad you can edit only position, rotation and 3-axes scaling. You can't scale one or two axes. You won't probably be able to see the changes correctly in game in that case. Doodadset Doodad sets are used to group doodads on your scene into sets. The model can have multiple sets which can be chosen in the map editor to be displayed in one particular WMO instance. Normally they are used to create different furniture blocks to add some variations to the appearance of the model. See the human farm once again as an example. Another common usage is to create the normal set of furniture and the broken set of furniture, see Westfall packs of human buildings. There is always one global doodad set which is displayed along with the selected set. Global doodad set cannot be turned off, however, it may be empty. See the global doodad set in human farm once again - it contains a few crates, some barrels, and smoke coming from the chimney. Those doodads are displayed on all the sets available. If you do not create a global doodad set, empty one will be created on export automatically. In order to add doodads to the doodad set: Select them and click Add to doodadset, there you will be able to create a new doodad set, create a new global doodad set or add to existing doodad set. Choose whatever you need. Export There are some export settings to be observed when you are ready to see your awesome model in the game: Operator presets - allows you to store "favorite" export settings for WMOs. Export selected objects - makes the exporter export only selected objects on the scene. Fill texture paths - automatically fills empty WoW Material texture paths based on texture filenames. Does not change the properties, in contrast to the same operator from the Quick WMO panel. Part 3. Balkron's tips & tricks 1. The fastest way to add anything You can press Shift+A hotkey to add anything to your scene very fast: 2. Disabling black vertex color As you can see, sometimes when you import models, they are black as night. So you can disable this problem: just create new vertex color layer and fill it with white color by Shift+K hotkey: 3. Disabling doodads lines 4. My tips for viewport You can switch your Viewport Shading options: My tips: modeling - Solid + disabled Textured Solid Simplified white models without textures. Easy to work with. bug-finding - Texture That way I can easily find UV-bug or geometry-bug, because there is no shading, but it keeps the textures. overview - Solid + enabled Textured Solid + white vertex color layer It ts the best way to take a look at your model without distortions. difficult model parts - Wireframe Just enable and select what you want without clipping and camera moving. 5. Numpad buttons I'm always using numpad buttons to navigate my models: Num 1 - front view Num 3 - right side view Num 4/6 - horizontal rotation Num 2/8 - vertical rotation Num 5 - orthographic mode Num 7 - top view Num 9 - flip to top/bottom view 6. Hotkeys Always try to learn Blender hotkeys. They will speed-up your work significantly. 7. Other addons You can download other addons to improve your workflow. I recommend F2, Magic UV, Loop Tools and Quad Unwrap. 8. Customize it Always keep making your workflow to be better. Custom hotkeys, themes, tabs placement - just try to make Blender work with you in the fastest way. 9. First person navigation (from Gratural) One more trick - Fly mode. Perfect tool for overwiev and camera move across your WMO's. Hotkeys: Shift+F - enable mod WASD - moving Shift - moving acceleration Space - jump to target face G - enable gravity LMB/Enter - disable fly mode Scroll Up/ Scroll Down - increase/decrease speed 10. Balkron's gifts I decided to share my settings-files with you. There are custom settings, hotkeys and theme. I hope you will find it cool and helpful Settings startup.blend userpref.blend Setup: %AppData%\Roaming\Blender Foundation\Blender\x.xx\config Theme balkron.xml Setup: Blender\2.78\scripts\presets\interface_theme Thanks for reading! This tutorial is relevant to the recent version of WMO addon for Blender. If the addon gets updated, the tutorial will be updated too. startup.blend userpref.blend balkron.xml
- 59 comments
-
- 14
-
-
I have custom made maps/vmaps/mmaps but still it dosn't seem to work with this normal pirateship (.wmo) It is spawned as a type 14 and I can't find any flags in the gameobject_template that might fix this problem. I only want to use the ship in a specific phase so noggit is a no. What to do?
-
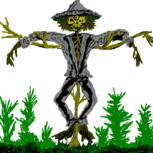
Hello! I'm sorry if this is obvious to some or that this has a easy fix. I have never worked with .wmo files and when I try to convert them they become green. I have checked all textures and that don't seems to be the problem. Can it be ParticleColor or something like that?
-
Greetings, I'd like to ask you of help in spawning buildings with interiors in it. I mean spawning interiors serverside or putting them inside in Noggit by hand is quite tidious. From what I know there are interior sets made by Blizzard that can be seen in Modelviewer however I have no idea of how to use them. Is it even possible? If yes, I beg you for an advice Thank you, Krysik [Solved]
-
Posting what I did on modcraft here as well :). I don't post much on the forums but I do however read quite a bit, the one thing I am getting a strong sense of, is how people want to move past WOTLK and onto the later expansions. (I am one of them ). I am also noticing at least 2 reasons as to why people have not so far. 1. To many different tools are needed to do so, alot of different tasks are needed to be done by to many different applications, when, in reality, the process could be simplified and integrated into 1 program (Noggit). For Example: Instead of using futa and adt adder then the offset fix and gruul me (4 different applications) to get your first map up and running. You can have a "Create New Map" button in noggit. When clicked it would ask you to input the map name, base texture, if you want it covered in water and what kind of water, and the general height of the adt. After all that is put in you hit a create button. Then a progress bar will show up as noggit automatically creates the adt files, does the offset fix, creates the wdt and wdl files all in one swoop. All that is left is for you to do the Map and Area DBC for it to be recognized. We have the source for all these programs if I remember correctly? You would still need Futa for alpha maps but the other 3 programs you would not need anymore. Basically intergrate the tools we are already using into 1 program instead of being split into many different programs. Gruulme would still have its use as well outside of noggit for if you change the size of your map or something like that, but I am sure that could be intergrated as well. I think you get the idea . 2. The other reason I think people aren't moving past wotlk is the server emulation. To be honest the other cores no matter how you slice it are not up to snuff with wotlk, which is no suprize. To be honest I could careless if everything is spawned and 100% blizzlike gameplay. I would rather have the empty sandbox where nothing is spawned but all the systems like say (spells, professions, questing, talents etc... etc..) are working 100%, spawning and such can come later (as that really is a ton of work). Besides, we are here to create our own gameworld inside the world of warcraft universe, why would we need the blizzlike spawns and encouners to be blizzlike scripted? No idea how to fix this one, besides just waiting . Those are the 2 main things I have noticed. We have an ADT converter, a wdt converter which can convert and create the necessary files needed for maps to be recognized in WOD (ADT, WDL, WDT). We have a M2 and WMO converter which can convert down to WOTLK or WOD. Which means we have the ability to read those specific files and convert them down and up correct, with the sources on how to do so? So if all that information and such is integrated into noggit we should be able to read and write adt files in noggit for later expansions (WOD mainly). We can use the info from the M2 and WMO converter to be able to render those objects in noggit (cause it would need to know how to read the M2 and WMO files). So that convers the maps and all the objects in that version of the game. We have the information, all that is left is to make it a reality right? Maybe its just me lol, I just believe all this stuff could be simplified greatly to make things quite a bit easier for everybody to do, so wow modding as a whole, can move past wotlk. I have actually tried to learn how to code in c++ (spent quite a lot of time on it actually) just so I could help with these things or do them myself, just, it didn't stick very well so it is gonna be quite a long time before I can be of use with these things as I need to learn it. Hopefully this helps with giving the people that can code, the ideas and thoughts needed to help things move forward? I would really love to see things step forward, as a whole.
-
Version 2.0
503 downloads
For more detailed description and screenshots visit this project's page: Patch contains always the newest version of all buildings, all textures used by them (I make copies of Blizzard textures, mainly because if anyone of you happens to have them already and have them edited in any way, the look of my models is preserved) and also all M2s used in doodad sets. Models are for 3.3.5a, so if you work on a newer expansion, WMOs should work just fine for you (if not, consult more experience devs in such matters than I am) and you might want and need to replace M2s in doodad sets by the ones which are actually for your expansion. I'm just a beginner at WMO creation, so you might want to edit these models a little bit. I'm always opened to suggestions and feedback (even while I also like to do things in my way, by my rules, following my opinions). You can use this for your personal projects, however, I'd like to ask you to add me into the list of contributors who helped you with creating that project. I probably shouldn't have to ask for this, it should be a matter of course, but... I think I don't have to finish this sentence. If you want to support me for making this, my Paypal account is jantoms@seznam.cz Version 1.0 - the first set of 4 buildings, which are quite small, have up to 2 rooms. No cellars, no doodad sets, have slightly bugged transparency at windows, those are reasons why they might be subject of change later. -
Nowadays import plugins for Blender can be used for importing the models and exporting them out of Blender. It is better to use this new software rather than tools demonstrated on the video. But the overall technique is the same.
-
1st Videos Says " basicaly its very usefull for Nogit spawning since you cant place M2s thru nogit into WMO you can simply do it by this way " But my 1st method was not best so far there was problems with quality looses etc ... so this second method is quietly far way better
-
Greetings, Again me, again this topic. I couldn't change texture's of wmo-s. 1. thing i need, merge indoor model with outdoor model, cause I see only this way to create custom interior for houses. 2. Delete existing doodad sets 3. Change the material path for meshes. 4. and if the mesh material doesn't fit well. and need little adjust on materil, how to save the adjusted material. Im fighting with this problems for ages. I would appreciate a really noob friendly guide! Here is an example: I wanted to retexture Windrunner spire from abbanonded veiny textures to clear ones, in UV editor i swapped the textures and replaced them then everything selected and shift+q and textface to material. in wmv crash. heeeeeeeelppp plzzzz
-
Hey! Cromon made an awesome tool called WMO editor and it was working perfectly for me, until one day it started crashing on startup for unknown reasons. Here is the error message: I tried compiling the source myself. Here's the error from VB:
-
I made a model in blender, and tried to export it as wmo but all of my custom wmo-s crash, when i try to look at them. What could be the source of the problem? My export settings are simple, Vertex shading off since its an outdoor model, and thats all.
-
How does one get a .WMO file from WoW? I want to edit .WMO files with Blender although I cannot find a way to get a .WMO file in the first place to then start learning with the .WMO tutorials on MC.net. I am working with 1.12.1 Classic WoW, I tried using WMOEditor although it seems that it not work with 1.12.1 Classic WoW. Does anyone have any suggestions on what to do?
-
Im working on a great release for you guys because of much help, I want to upload whole dalaran with detached parts each house, wall and tower without the ground. before i make all the stuff i wanted to test if it works and i did it well because i bumped into problem.As you can see i detached in blender this bigger part of the city and i want to make further slices from this what you can see on the picture.BUT i have a problem How to solve this problem? I also include the blender picture.with interiors. In the picture from outside i cant see the interior and i see through the model when i try to go inside i crash to desktop.Anybody? Edit: I also tried to took parts from instances and put it into noggit but i got crash when i go near my custom WMO-s (i put it into outdoor which was instance wmo part)
-

Version Sources
8,027 downloads
Someone picked up the development, go >here< to follow the progress and send your issues Here is my multi converter, it can convert m2, wmo, adt, wdt and anim (7.3.5) from Legion to be used on wotlk (map can be visited with the client or edited with noggit). M2 using .skel are not supported. To use it just open it then drag and drop the files you want to convert (or a folder containing some, subfolder included) and click on "Fix", the files will be overwritten and it will delete the files that are unused on wotlk. If the .skin files are in the same folder they will be converted too. M2 already converted to LK format won't be converted again. As for WMO converting them multiple time won't affect them. ADT need their _tex0 and _obj0 counterpart to be converted. Warning: don't take the WDL files from blizzard, they have changed and causes wow error. Warning 2: the next releases of Noggit will require you to use the version 3.3 or newer, the m2 converted with the old versions were missing some data that Noggit now need, without it'll crash. What needs to be done : Fix forward flying animation for a few models Animation particles Set WMOs liquid types that correspond when the ID is too high Set fel liquid to green lava on adt for a better / more accurate look Some map might not look good because several effect like texture scaling that aren't there in wotlk, the 2 additional layers for texture introduced in wod, ... For those who want to report a problem : Tell me on which model(s) you've seen the problem and add screen(s), it help me fixing the problem faster. And send me your error.log where there are errors during the conversion !! And please use an external website to upload the screens because each time I upload a new version the screenshots in comments appear in the changelog for some reasons and I have to delete them which also delete them from the comments Thanks a lot to : All those who contributed / are contributing to the wiki, I couldn't have done it without this precious source of informations! Mjollna for her m2 converter and awesome ADT diagram! PhillipTNG for his m2 conversion script which helped me write mine in the beginning. Sources are now available, see last release. -
Version 1.0.0
39 downloads
Purpose: Enables vertex shading (MOCV) in WoW .wmo model by setting an appropraite flag. Usage: Prerss F7 to run the script. Select group WMO files.. CMD version: Not available, not planned. Requires: WoWWMO.bt In order to run any of my scripts you need a new version of 010 editor binary templates which can be downloaded here. -
Version 1.0.0
68 downloads
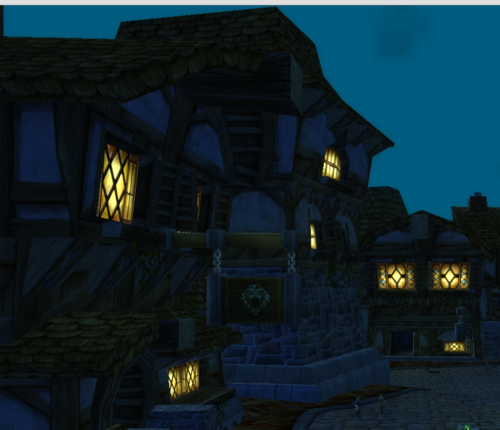
Purpose: Modifies specified materials in a WMO to glow at night. Used for window and lantern textures mostly. Usage: Prerss F7 to run the script. Select root WMO files you want to modify. The script with show you windows with texture names. If the texture is meant to be lightened click "Yes", if the texture is meant to stay the same click "No" and if you want to stop the process click "Cancel". Note: all the data that has already been modifed will be saved when you cancel, the script just won't go futher. CMD version: Not available, not planned. Requires: WoWWMO.bt In order to run any of my scripts you need a new version of 010 editor binary templates which can be downloaded here. -
Okay well can this be a thread for people like myself who have no damn clue what is going on but want to create cool things with WoW but need some kind of additional modding guidance? Okay so I will start off with a video of myself asking for guidance in how to create a second level of Tinkertown with a gnomeregan elevator.
-
Version 3.0.0
241 downloads
Hey! I was really annoyed by having to restart noggit every time I changed the text file I imported models from. So, I made this import.txt, that includes every .m2 and .wmo file (except for shaders, skyboxes, spells and armor (includes weapons)) up to and including the currently known Legion files. It worked nicely, so I thought I'd share it.- 6 comments
-
- 2
-
-
- noggit
- leveldesign
- (and 2 more)
-
Hey! I used the following script (made by Skarn) on the undercity_xxx.wmo files in hopes to change the green slug to water: //-------------------------------------- //--- 010 Editor v6.0.3 Script File // // File: // Author: // Revision: // Purpose: //-------------------------------------- char sFile[]; int sIndex; int x, y, k; TOpenFileNames f = InputOpenFileNames( "Select .wmo files", "(*.wmo)" ); for( k = 0; k < f.count; k++ ) { sFile = f.file[k].filename; sIndex = FileOpen(sFile); if(sIndex < 0) return; RunTemplate("WMO_group.bt"); if (wmo_group.group_info.liquidType != 0) wmo_group.group_info.liquidType = 1; } FileSave(); Now when I go to undercity ingame my client crashes with the followinng error: Please, help!