Atraxian
-
Content Count
46 -
Joined
-
Last visited

-
(This is for Azerothcore) I think you can start with https://www.azerothcore.org/wiki/dbc-areatrigger and https://www.azerothcore.org/wiki/areatrigger_teleport then see how an area teleport is made: For example, You have to open your game database. id 45 in aretrigger database is the teleport to the scarlet monastery (graveyard) instance. It has a map id for the map it is located in (0 = Azeroth / Eastern Kingdoms) then a position for the center of the area trigger and its radius. The rest are 0, but are used for a box trigger and not a spheric trigger. If you then go to id 45 of areatrigger_teleport to add the target map and the position + orientation of the teleport destination. After you made your areatrigger, then attached a teleport to it, you just have to place your doodad around the area. But the doodad itself will not have any teleportation property. I hope this helps.
-
Sadly, the italian keyboard has a different layout and we don't have that key (instead we have \ | on the left of 1). in case you aren't already using it, Keira3 is a great tool for editing creatures or game objects one by one. https://github.com/azerothcore/Keira3
-
Try something like this: UPDATE `creature_template` SET `rank` = 2 WHERE (`entry` = 5291); Using ` at the start and end of rank should make HeidiSQL recognize it as a column name and not as a command. Note that ` is a special character and not an apostrophe like ' (I know, the difference is hard to see, but if you use an apostrophe, heidisql will recognize the text as a string), an easy way to have it at the ready if your keyboard doesn't have it is to copy and paste it in a document and bring it up whenever you need it It looks like this:
-
3.3.5a Grand Drake Mounts High-Res
Atraxian commented on Atraxian 's file in Creatures, Items and other M2s
 Fixed the horns on Onyxia and Nefarian models. Currently uploading the files
 -
3.3.5a Grand Drake Mounts High-Res
Atraxian commented on Atraxian 's file in Creatures, Items and other M2s
Sorry for the late answer. I think a quick fix would be to open the .m2 and change the flags of the material to make it 2-sided. I'll check later in the day and if I can fix it, I'll post an updated model. Nefarian might have the same issue. -
I think the highlights are also part of the textures in the interface folder, but I'm not 100% sure where they are. Same for the continent maps, I think you can find the textures in the interface folder. EDIT: for the continents Interface/worldmap/Azeroth/ Interface/worldmap/Kalimdor/ contain the textures + highlight for the continent maps As for the positions of the points of interest, the highlights of each zone, ecc, I think most of them are stored in .dbc files relating to the maps,
-
If vanilla works the same way as WotLK your best bet is to look for the .blp chunks of the worldmap in your .mpq files. They should be in interface/worldmap/world/ or similar. Extract them and take note of their names. Do the same with the corresponding .blp files from WotLK, rename them correctly and make a new .mpq files with those textures in the correct path. It is possible though thqat the highlight of the zones or continents in the in-game map will be a little offset from the new bap background.
-
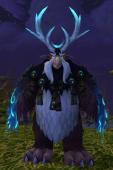
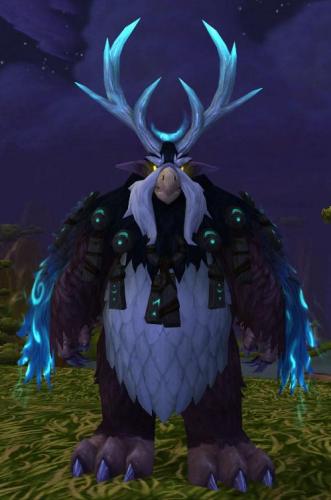
Tindral Moonkin models for 3.3.5a
Atraxian commented on Atraxian 's file in Creatures, Items and other M2s
 I generally use folders called Patch-(letter).mpq instead of compressed mpq files. It seems to work.
 -
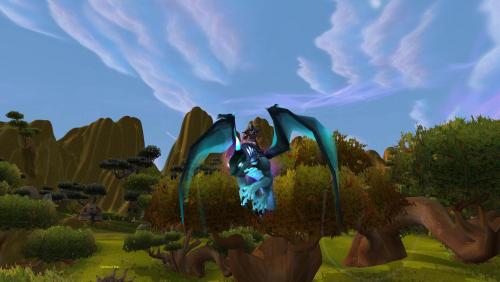
3.3.5a Nether Drake Mounts High-Res
Atraxian commented on Atraxian 's file in Creatures, Items and other M2s
 Just added a saddle-only version
 -
3.3.5a Nether Drake Mounts High-Res
Atraxian commented on Atraxian 's file in Creatures, Items and other M2s
Argh, I forgot about that. Sorry. I never found a solution for that apart from making different models with and without the armor... Sorry, I'll get down to it as soon as I have some free time and update the download. -
3.3.5a Nether Drake Mounts High-Res
Atraxian commented on Atraxian 's file in Creatures, Items and other M2s
Using WDBX Editor, click on the column options and select Display as Hex -
Version 1.0.0
149 downloads
Tindral Moonkin models retroported from the Dragonflight beta. Since the model needs 4 textures and WotLK only uses 3 changeable textures for monsters, I had to hardcode the skin colors and make multiple models. Models: Tindralmoonkin_Base.m2 Base model without glowing effects Texture1 = skin Texture2 = horns Texture3 = jewelry Tindralmoonkin_(color).m2 Models with the different glowing effect. Each model has a specific skin color Texture1 = glow color Texture2 = horns Texture3 = jewelry The models are customizeable through the CreatureDisplayInfo.dbc CreatureGeoset column. 0x000000A = A from 1 to 4 Beak customization 0x00000B0 = B from 1 to 6 Eyebrows customization 0x0000C00 = C from 1 to 5 Beard customization 0x000D000 = D from 1 to 3 Wings customization 0x00E0000 = E from 1 to 6 Horns customization 0x0F00000 = F from 1 to 5 Jewelry customization 0xG000000 = G from 2 to 5 Glow customization -
Hig-Resolution Drakes for 3.3.5
Atraxian commented on Atraxian 's file in Creatures, Items and other M2s
 Sure, you can open the .m2 files with 010Editor, use the m2 template you can find on the download section of the site and change the Z axis value of the first attachment point.
 -
Version 1.0.0
105 downloads
High resolution nether drakes. I used the body of the grotto nether drake and modified the wings of the dragon2 model to make them more similar to the old netherdrake models. In CreatureDisplayInfo.dbc use: Texture1 = body color texture Texture2 = glowing bits texture (horns and stripes) Texture 3 = saddle / armor texture It is a single model with the possibility to add armor, helm or saddle depending on the used geoset numbers in CreatureDisplayInfo.dbc In the CreatureGeosetData column use 0x23 for the mount without armor and saddle 0x21 for the mount with a saddle 0x22 for the mount with armor 0x11 for the mount with saddle and helm 0x12 for the mount with armor and helm I hope you like them -
3.3.5a Grand Drake Mounts High-Res
Atraxian commented on Atraxian 's file in Creatures, Items and other M2s
You can use WDBXeditor to open the CreatureModelData.dbc, look for the line with the path for creature\dragon\onyxiandrake.mdx and change that. Then take note of the ModelID and look in CreatureDisplayData.dbc for the line with that model id and change the name of the textures to the correct ones.

