Balkron
-
Content Count
106 -
Joined
-
Last visited
Everything posted by Balkron
-

Version 1.0
545 downloads
Supported Formats Windows x64 Windows x86 (32-bit) Mac OS X 10.6 (Lion)+ CS4 6.0 CS5 CS5 7.0 CS6 CS6 CS CC CC CS2 CC 2014 CC 2014 CS3 CS4 CS5 CS6 CC CC 2014 InstallationWindows Find your Photoshop Folder (x64) C:\Program Files\Adobe\Adobe Photoshop CS6 (64 Bit)\ (x32) C:\Program Files\Adobe\Adobe Photoshop CS6\ From that folder, go to \Plug-ins\File Formats\ (create "File Formats" folder if it doesn't exist) Drop the appropriate plugin (x64 or x86) in that folder. Run Photoshop OS X Find your Photoshop Folder e.g. \Applications\Photoshop CS6\ From that folder, go to \Plug-ins\File Formats\ (create "File Formats" folder if it doesn't exist) Drop BLP.plugin in that folder Run Photoshop Supported VariantsIt was my goal to support every variant of the BLP format that Blizzard uses in WoW - for both opening and saving. The end result is a total of 11 different combinations of compression and transparency. Below is a listing of these.Alpha Bit DepthsThis is the amount of detail allowed in transparency of your image. 0-bit - No transparency at all 1-bit - simple transparency, similar to GIFs. It's either transparent or not. 4-bit - slightly better range of transparency, but will turn smooth fades into visible "steps" 8-bit - This is the same level of transparency you'll ordinarily see in PNG/TGA formats, with 256 levels of transparency. Compression Types Indexed (256 Color) - Very similar to a GIF, as it uses a palette that can fit up to 256 colors, but BLP files have indipendent transparency. Indexed BLPs can make use of all 4 types of alpha. DXT - This is the defacto compression type used in modern games, with the most popular format that uses this, being .dds. DXT compression gives you a better color range, with a slightly larger size, than indexed. It also supports all 4 levels of transparency. DXT-5 - Would normally be lumped in with the above category, however it's the second DXT type that supports 8-bit alpha. The result is a bit better color, and a slightly larger file size than the 8-bit alpha under the DXT category. Uncompressed - Very much like a Bitmap, with no compression to speak of. It can support either 0-bit or 8-bit alpha. This version is only used by Blizzard for sky textures, where every bit of color detail is necessary. -
Version 1.1
3,767 downloads
This template allows you to create World of Wacraft-styled Blizzlike world maps. Video tutorial coming soon! P.S. Since video isn't done yet, I recommend paying attention to Skarn's (out-of-date, but still) world map tutorial to learn how to use it.- 3 comments
-
- 20
-

-
Version 2.0
6,684 downloads
All the patches will be done as non-encrypted soon! This file contains HD characters and NPC models and textures for WotLK. The archive contains 4 patches: patch-w.mpq contains: NPC models Animations BakedNPCTextures patch-x.mpq contains: Character models Animations patch-enUS-w.mpq and patch-enUS-x.mpq contain: DBCs If you have questions/requests feel free to ask it in the comments or by PM, I will answer it as soon as possible. P.S. The previous versions of files by @Roarl were deleted, because of the wrong and non-existed links. All thanks should be given to him. -
THE ADDON IS OUT OF DATE! THE UPDATE WILL COME ~ ON SUMMER Introduction Hello, Model Changing Network. In this tutorial I want to show you how to edit and create WMO models using Blender WMO addon. Actually, this addon is much more than a usual import/export Blender plugin. Besides core functionality of importing and saving edited WMOs, this addon is also a powerful editor supporting nearly all (you still cannot create working transport objects with it) features of World of Warcraft World Model Object (WMO) files. What is World Model Object? World Model Object or just a WMO is a special compound 3D structure used in the game World of Warcraft for making buildings, dungeons and other big complicated 3D objects. It does not only contain traditional 3D model parts as geometry, UV maps, materials and so on; but it does also support features like liquids, complex lighting system, portal culling system and much more. Donation The provided software is available completely free of charge, however, if you want to support the development, here is Skarn's PayPal account. He is also working on a similar Blender plugin for .M2 models. So, by helping him, you can speed up the development of two tools at once. Currently supported features: Geometry Materials Lightmaps Double-UVs Collision and more. Portals Liquids Lights Fogs Doodad Sets Various WMO settings Requirements Blender WMO addon WoW Model Viewer BLPConverter Part 1. Installing addon and configuring your Blender Download and install the latest Blender version (2.78c or newer). Download WMO addon and place it into addons folder inside of your Blender folder: blender\x.xx\scripts\addons\io_scene_wmo\ Download WoW Addon Pack which contains WoW Model Viewer and BLPConverter and place it into your WoW Tools folder: In this tutorial I will use this path: D:\Work\WoWTools\ Step 1. Enable the WMO addon Step 2. Fill your tools paths Always click on Save User Settings button after editing the addon preferences Now you are able to export and import .wmo models right from your Blender Part 2. Basics and peculiarities of WMO editing using Blender This addon is designed in quite a special way and it would probably be better to import some existing .WMO model from WoW to learn how to operate it because the WMO from WoW will be already configured correctly by itself. For this purpose, I am going to use a small human farm. In this tutorial I won't explain how to create models in Blender. I will just tell you how to make them work as a .wmo in the game. I will cover the unusual parts that are different from the normal Blender usage. Quick WMO Tab This tab is the easiest way to edit your model. There are few main sections: Display - used for displaying different object types on the scene Add to scene - used for adding different object types to the scene Game data - used for loading your WoW MPQ patches from your data folder (Part 1 Step 2) Selected - used for converting selected objects and materials Apply - used for applying different actions to objects Doodads - used for doing different actions with the doodads on the scene Material This addon uses his own special material properties called WoW Material which are bound to Blender material. There you can specify the texture you apply to the model by setting a path to it and a few other less important settings: Shader used for producing special WoW render effects Terrain Type used for producing footsteps sounds and footprints Blending used to control texture blending on rendering Texture 1 diffuse texture (object) Texture 2 environment texture (blending) Flags used for defining special render options for the texture Emissive Color the color of the object when no light falls on it Diffuse Color base color of the object Flags Unlit disable world lighting effect Unfogged disable world fog effect TwoSided render from both sides Exterior light ignore local WMO lighting, use world lighting instead NightGlow used for windows to glow at nighttime Window has no description yet, used for windows In order to assign the texture to the geometry you need to assign a usual (Blender) material to it Go to material properties, find a tab called WoW Material and specify the required settings there: When you assign and tweak all of them, the textures will be visible in-game Collision In order to create collision for a model you need to go to Quick WMO Tab and click on Quick Collision: That's all! One button click - pretty easy, isn't it? WMO groups World of Warcraft WMO supports two group types - indoor and outdoor. Outdoor is used for exterior objects and is influenced by the zone lighting. Indoor is used for interior models, interior parts of models. It is not getting influenced by the external light. If you are planning to use indoor groups in your scene you will have to create portals for them. I will explain how to make them later. For setting group types, select your objects and click to Convert selected --> To WMO group and also specify a type of the group: In the same preference tab you can also see various settings: Name - Object's name is saved into the files and is only used for development purposes, for example, when you inspect your model using a 010 editor. Please do not name as "Antiportal", an internally reserved name that actually makes sense for the game. Description - group description, which is also used only for development purposes. Name it whatever you want or leave blank. Place Type - select type for your group: indoor or outdoor. Flags - enable/disable different flags for your model. You can always see the description of each flag when you hover it: DBC GroupID - connected with AreaID for WMO. Used to detect indoor groups for example, so the server can dismount you when you enter them. LiquidType - fills this WMO group with selected liquid. Portals Portals are used to connect indoor groups to outdoor groups or other indoor groups. If the portal is not set but the indoor group is used, you will have the indoor group rendered only while standing in it, everything else will look like emptiness. A portal is a plane that, in most cases, contains only 4 vertices and one face. Portals are created as separate objects (you can see them in the outliner if you import some original WMO like I did with human farm). If the portal is bugged in-game: Step 1. Select your portals Step 2. Use Bake portal relations button Step 3. Use Set portal direction button with Auto option selected If it is still bugged, try one either Positive or Negative unless the portal starts working. If it does not help, make sure that relation baking algorithm has bound the correct WMO groups to the portal object. Creating custom portal geometry There is nothing complicated in making custom portal geometry. Though, remember that it should be precisely on the edges that connected groups share between each other. So, in order to create a correct plane for a custom portal select one of the groups. Simply select 4 corner vertices and press F. It will generate a plain between them. Then select this plane and press P. In the opened menu choose By selection. It will detach the plane to a separate an object, so that you can fill in the settings. If you move the portal from that point it will be bugged in-game on camera rotation. Be careful with that. Step 1. Convert your plane to WMO Portal: Step 2. Bake portal relations. Step 3. Set portal Auto direction if set otherwise. Done! Much easier than in previous addon version. Just make your plane and click on these 3 buttons. Easy peasy Vertex color You can paint vertex colors on WMO groups. It is used for lighting and coloring particular places of a group. For doing that switch to Vertex paint mode. You can learn vertex painting features by practice or by using some Blender tutorials or documentation. Don't forget to enable Vertex color flag in WoW WMO Group tab else the color won't be seen in game. The flag is forced on export for indoor groups, though. For filling, pick up a color and press Shift + K Better than Photoshop, right? Fog The fog effect mimics the scattering of light in a fog. Objects in the distance become less contrasting and acquire a fog color. In night scenes fog is usually dark, in daytime - whitish or slightly bluish, just like real fog. In Blender WoW Fog looks like transparent sphere. In order to add a fog, you just need to click on Add Fog button in Quick WMO Tab: Fog has some simple options to work with: Ignore Radius (probably) makes fog global Inner Radius a radius of fog starting to fade Farclip anything further away from the eye than the far clipping distance isn't displayed (it's too far away) Nearclip anything closer to the eye than the near clipping distance isn't displayed (it's too close) Color fog color Underwater farclip same as Farclip, but under the water Underwater nearclip same as Nearclip, but under the water Underwater Color fog color under the water One-button-action. Again?! Water Water - used to make WoW liquid in your model. In order to add water you need to click on Add Water button in Quick WMO tab: You can't scale water! Just edit your water size (subdivisions) in left bottom corner when you're creating it. WoW Liquid group has own options: LiquidType - type of liquid in WoW. There are lots of variants to work with: Color - water color WMO Group - parent group for this liquid. Use an eyedropper or type the WMO group name to select a parent object. Flags If you switch to vertex paint mode when the water plane is selected, you will be able to set flags to quads that control the rendering of the water. We do not yet know what most of them means, so if you figure that out, please tell Skarn, he will rename the buttons. There is an easy way to work with water. Just tweak your options to get a perfect result. Scale This function is used to add a visual placeholder for taking some information about your model proportion. Just click on the button: You can edit your Scale Type in the left bottom corner when you're creating it: Batch Types. Lightmaps. Blendmaps. Second UV Batches are groups of faces which are used to accelerate rendering. World of Warcraft WMO supports two batch types - Batch A and Batch B. Batches are usually used only for interior groups. Batch A is influenced by the outdoor (zone) lighting. Batch B is not getting influenced by the external light from outdoor groups. Lightmaps - used to accelerate light rendering. Normally used in Batches A in order to blend the geometry with world lighting. See the entrance of the human farm in order to see how it works. Blendmaps - used to accelerate texture blending. If your material is using one of the TwoLayer shaders, you enter a second environment texture path, which will blend with the diffuse texture according to lightmap values. SecondUV - used to define the UV map for double texture materials. Just create a new UVmap, edit it and bind to this property. Step 1. Enable Edit Mode Step 2. Assign faces to vertex group Step 3. Select your group in batch vertex group In order to work with Lightmaps: Step 1. Create vertex group, enable Weight Paint Mode and do your edits Step 2. Select your group in Lightmap vertex group Weight Paint palette: Weight = 1 - red color. Maximum effect Weight = 0 - blue color. Nothing happens. You can learn weight painting features by practice or by using some Blender tutorials or documentation. Blendmaps are painted by the same way. Just try it by yourself. Not so long for making your model looks realistic. Just keep improving your skills at it. Doodads and models importing This function is used to import WoW models (.M2 and .WMO) directly from WoW Model Viewer in a very fast way. Add WMO - used to import the last selected .WMO model from WoW Model Viewer. Imported model will be just a usual Blender object to be edited. Add M2 - used to import last selected .M2 model from WoW Model Viewer. This model is just a visual placeholder for real WoW model. Imported model will have the property WoW Doodad assigned. WoW Doodad has own options: Path - real WoW model path in your patch Color - Doodad color (overlayed effect) Accept Projected Texture - keep textures with enabled Projected Textures in WoW game options Adjust lighting - applying local doodad lighting For WoW Doodad you can edit only position, rotation and 3-axes scaling. You can't scale one or two axes. You won't probably be able to see the changes correctly in game in that case. Doodadset Doodad sets are used to group doodads on your scene into sets. The model can have multiple sets which can be chosen in the map editor to be displayed in one particular WMO instance. Normally they are used to create different furniture blocks to add some variations to the appearance of the model. See the human farm once again as an example. Another common usage is to create the normal set of furniture and the broken set of furniture, see Westfall packs of human buildings. There is always one global doodad set which is displayed along with the selected set. Global doodad set cannot be turned off, however, it may be empty. See the global doodad set in human farm once again - it contains a few crates, some barrels, and smoke coming from the chimney. Those doodads are displayed on all the sets available. If you do not create a global doodad set, empty one will be created on export automatically. In order to add doodads to the doodad set: Select them and click Add to doodadset, there you will be able to create a new doodad set, create a new global doodad set or add to existing doodad set. Choose whatever you need. Export There are some export settings to be observed when you are ready to see your awesome model in the game: Operator presets - allows you to store "favorite" export settings for WMOs. Export selected objects - makes the exporter export only selected objects on the scene. Fill texture paths - automatically fills empty WoW Material texture paths based on texture filenames. Does not change the properties, in contrast to the same operator from the Quick WMO panel. Part 3. Balkron's tips & tricks 1. The fastest way to add anything You can press Shift+A hotkey to add anything to your scene very fast: 2. Disabling black vertex color As you can see, sometimes when you import models, they are black as night. So you can disable this problem: just create new vertex color layer and fill it with white color by Shift+K hotkey: 3. Disabling doodads lines 4. My tips for viewport You can switch your Viewport Shading options: My tips: modeling - Solid + disabled Textured Solid Simplified white models without textures. Easy to work with. bug-finding - Texture That way I can easily find UV-bug or geometry-bug, because there is no shading, but it keeps the textures. overview - Solid + enabled Textured Solid + white vertex color layer It ts the best way to take a look at your model without distortions. difficult model parts - Wireframe Just enable and select what you want without clipping and camera moving. 5. Numpad buttons I'm always using numpad buttons to navigate my models: Num 1 - front view Num 3 - right side view Num 4/6 - horizontal rotation Num 2/8 - vertical rotation Num 5 - orthographic mode Num 7 - top view Num 9 - flip to top/bottom view 6. Hotkeys Always try to learn Blender hotkeys. They will speed-up your work significantly. 7. Other addons You can download other addons to improve your workflow. I recommend F2, Magic UV, Loop Tools and Quad Unwrap. 8. Customize it Always keep making your workflow to be better. Custom hotkeys, themes, tabs placement - just try to make Blender work with you in the fastest way. 9. First person navigation (from Gratural) One more trick - Fly mode. Perfect tool for overwiev and camera move across your WMO's. Hotkeys: Shift+F - enable mod WASD - moving Shift - moving acceleration Space - jump to target face G - enable gravity LMB/Enter - disable fly mode Scroll Up/ Scroll Down - increase/decrease speed 10. Balkron's gifts I decided to share my settings-files with you. There are custom settings, hotkeys and theme. I hope you will find it cool and helpful Settings startup.blend userpref.blend Setup: %AppData%\Roaming\Blender Foundation\Blender\x.xx\config Theme balkron.xml Setup: Blender\2.78\scripts\presets\interface_theme Thanks for reading! This tutorial is relevant to the recent version of WMO addon for Blender. If the addon gets updated, the tutorial will be updated too. startup.blend userpref.blend balkron.xml
- 59 comments
-
- 14
-
-
Hi Model-Changing! Right now I preparing to record my modeling tutorial series in Blender and upcoming WoW Blender Studio release (WBS still in develiopment, there is no release date). The point of this topic is 'help'. I need your help, dear modders! For these series I decided to make a plan, where each lesson should cover one separate field of knowledge: Green - approved Yellow - approved, but there are some unresolved moments Red - raw proposal General Parts: Inrtoduction and requirements. Basic 3D modeling workflow in general Blender modeling guide. UI, tools, modifiers Tips&Tricks. Hotkeys WMO Parts: Basic principles of environment design Basic principles of stylized modeling Blizzard's WMO analysis and differences (Classic -> WotLK -> BfA) WoW Blender Studio. WMO scene type workflow Up-res an existing WMO (Classic or WotLK to BfA level) WMO creation. Part 1: Creation workflow. Modeling (human house?) WMO creation. Part 2: UVs and textures (human house?) WMO creation. Part 3: Interior, doodads, portals, settings, export, check in-game (human house?) Complex WMO creation. Part 1: Approach. Planning. Blocking out (city quarter?) Complex WMO creation. Part 2: Modeling (city quarter?) Complex WMO creation. Part 3: UVs and textures (city quarter?) Complex WMO creation. Part 4: Separate WMO parts export feature (coming soon in WoW Blender Studio) M2 Parts: Props (short form of 'Properties') - static scene object in 3D environment Basic principles of props creation Basic principles of stylized props modeling Blizzard's M2 props analysis and differences (Classic -> WotLK -> BfA) WoW Blender Studio. M2 scene type workflow Up-res an existing props (Classic or WotLK to BfA level) Prop creation. Part 1: Creation workflow. Modeling (sword?) I would like to hear what are you interested in. If needed, I can make few props for different puproses. Prop creation. Part 2: UVs (sword?) Prop creation. Part 3: Handpainting (custom texture painting tutorial) Prop creation. Part 4: Settings, export, check in-game (sword?) Particles (torch? waterfall?) I would like to hear what are you interested in. If needed, I can make few props for different puproses. Basic principles of character creation Basic principles of stylized creature and character modeling Blizzard's M2 creature analysis and differences (Classic -> WotLK -> BfA) Up-res and existing creature (Classic or WotLK to BfA level) Creature creation. Part 1: Creation workflow. Sculpting in ZBrush (high-res model creation) (ogre?/beast?/new race?) I would like to hear what are you interested in. If needed, I can make few creatures or characters for different puproses. Creature creation. Part 2: Retopology Creature creation. Part 3: UVs Creature creation. Part 4: Using ZBrush for stylized texture creation. Handpainting Creature creation. Part 5: Rigging. FK/IK (forward and inverse kinematic). Controllers Creature creation. Part 6: M2 Animation Editor (WBS). Animation Creature creation. Part 7: Settings, export, check in-game Optional tutorials: Concept art: Buildings, environments Concept art: Creatures, props I want to hear from you any proposals about each lesson that listed here. If you want to learn something, but there are no tutorial here, please share your thoughts and ideas in this topic!
-
Создание первого патча MPQ и добавление его в игру World of Warcraft (в версиях клиента с Classic (1.12) до Mists of Pandaria (5.x)) для хранения игровых данных использует MPQ-патчи. В World of Warcraft версии Wrath of the Lich King (3.3.5а) MPQ-патчи расположены только в двух папках директории игры: в папке Data и папке локализации, которая названа в соответствии с языком вашего клиента (прим. enUS, ruRU, deDE, frFR). Чтобы ваши модификации клиента работали в игре, вам необходимо создать MPQ-патч и поместить его в одну из этих папок. Прежде чем мы начнем создавать патч, давайте посмотрим, в чем разница между папками Data и локализацией (locale). Все MPQ-патчи в папке Data одинаковы для каждого клиента независимо от того, какая локализация выбрана. Таким образом, здесь хранятся почти все файлы, включая модели, текстуры, карты и пр. Патчи локализации содержат информацию, которая может различаться в зависимости от языкового пакета клиента. Например, в этих патчах содержатся файлы интерфейса, DBC (клиентские базы данных), звуковые файлы и пр. Теперь можно приступить к созданию вашего первого MPQ патча! Шаг 1. Создание патча Откройте MPQEditor, который можно скачать у нас на сайте: Откройте File и выберите New MPQ. В результате откроется окно: Введите название патча в первом поле. Если ваш клиент еще не был модифицирован, вы можете использовать «patch-4» как название для вашего первого патча. Нажмите Next (или Далее, если система автоматически переводит кнопки, как в моём случае). Дело в том, что клиент WoW'a устроен так, что осуществляет чтение патчей в алфавитном порядке. Сначала происходит чтение числовых патчей (от 1 до 9), далее читаются буквенные наименования патчей (от A до Z). Так как существующая структура игры (рассматривается версия 3.3.5) уже имеет патчи с первого по третий, вы можете назвать свой патч patch-4.MPQ или patch-5.MPQ и так далее. Количество патчей ограничено лишь количеством незанятых цифр и букв латинского алфавита. В следующем окне нажав на кнопку Change вы можете выбрать версию вашего клиента в параметре Game Compatibility: Жмём Далее: В данном окне вы можете выставить максимальное кол-во файлов для вашего патча. На данном этапе обучения это значение не так важно, поэтому им можно пренебречь и нажать Далее. В конце мы увидим окно, суммирующее информацию о вашем будущем патче. Шаг 2. Добавление файлов в патч После того, как вы создали ваш патч, внутрь вы можете поместить модифицированные файлы клиента, которые вы хотите увидеть в игре. Для этого вы можете просто перенести файлы в область окна MPQEditor'a (drag-n-drop). Помещать в патч вы можете как отдельные файлы, так и целые структуры папок. Поместите свой патч в папку Data игрового клиента Теперь вы можете увидеть ваши изменения в игре! Шаг 3. Проверка в игре Запустите локальный тестовый сервер TrinityCore, войдите в игру и телепортируйтесь на интересующую вас локацию с вашими изменениями.
-
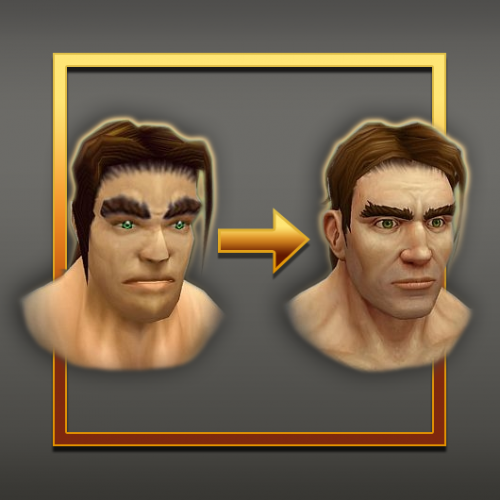
Graphics / Models Models: M2 wiki link Image showing different use of M2 models M2 files contain model objects. Each M2 file describes the vertices, faces, materials, texture names, animations, and properties of one model. Models are used for doodads (decoration objects), players, monsters, and really everything in the game except for Terrain and WMOs. M2 file mostly contains technical information about the model, animations, textures, bones, particles, rendering info, lights, cameras, etc. Each new expansion is always accompanied by changes in the file format from Blizzard. Modders cannot use new models from new expansions due to these changes. That's why we need to use converters (e.g., Adspartan's Multiconverter), file exporters (convert m2s to obj/fbx), 3D software add-ons (e.g., Blender WoW Studio), etc. Due to the lack of full-fledged programs and tools, people who just started modding had to make all changes to models and data manually with the 010 Editor. Despite this, in the current circumstances, there is always room for manual research or editing models. Due to changes in the format, the tools lose their relevance. Community developers have to work together to implement updates for the tools that allow the community to work with the newest models and data. But this is not always possible. Geosets (geometry sets) Geoset is an individual object that makes up complex models. Let's analyze how geosets work on the model of humanmale.m2 In the image above, you can see different options for the appearance of gloves, boots, hairstyles, and various other model parts. Each part is a separate object. Each one of them has it's own material (one per geoset, it's strictly limited). Geosets determine the appearance and form factor of objects, external character traits (hairstyle, beard, jewelry), and the way how they are displayed. Textures For each material, there is only one texture. That's a strict limitation too. You can define textures in a two ways: directly for geoset or through the DBCs. Unlike WMO, for M2s, there is a possibility of using animated textures. Textures can be animated in different ways, such as transformations (X and Y coordinates) and texture animation itself (per frame animation). We will cover these topics more in-depth in the next lessons about M2. Bones (rig) Like any animated game model, the character is very complex and filled with various technical objects. To make a model move, it needs a skeleton. The skeleton consists of bones, each of which gives a motion for a specific part of the model. Bones can create various dependencies and hierarchies to create the correct structure and movement of the model. Bones (highlighted) are used to animate the mesh. Attachments Attachments (outlined black spheres; see previous images above) are used to attach other objects to mesh. E.g., weapons, shields, shoulders, helmets, etc. There are lots of different places where attachments are used, such as mounts, particle impacts, footprints, and other (not so obvious!) game mechanics. Animations M2s can contain animations inside the .m2 file. It also can be put inside the separate .anim files, which are used to hold all the additional animations (if there is too much to contain inside .m2). Animation refers to the temporal description of an object (i.e., how it moves and deforms over time; popular methods include keyframing and inverse kinematics). These techniques are often used in combination. As with animation, physical simulation also specifies motion. In WoW, there are just usual keyframing without any motion capture or realistic physics simulations. Effects wiki link In WoW modding effects are: Particle Emitters Ribbon Emitters Texture Transformations (texture animation) Particles wiki link A particle system is an engine subsystem that uses a large number of tiny sprites, 3D models, or other graphic objects to simulate certain kinds of "fuzzy" phenomena. All of these are very hard to reproduce with conventional rendering techniques - usually highly chaotic systems, natural phenomena, or processes caused by chemical reactions. Typically a particle system's position and motion in 3D space are controlled by what is referred to as an emitter. An emitter acts as the source of the particles, and its location in 3D space determines where they have generated and their movement direction. A regular 3D mesh object, such as a cube or a plane, can be used as an emitter. An emitter contains a set of particle behavior parameters. These parameters can include the spawning rate (how many particles are generated per unit of time), the particles' initial velocity vector (the direction they are emitted upon creation), particle lifetime (the length of time each particle exists before disappearing), particle color, and much more. Spells Spells are magic incantations or effects conjured up by whatever game mechanism the developers allowed. Spells can do different kinds of damage, or healing. They can also cause beneficial effects (aka buffs) on friendly characters or harmful effects (aka debuffs) on hostile mobs. In WoW modding spells are particle emitters with different settings and parameters, such as ribbons (trails), sounds, etc. M2 Usage M2 models can be used not only for characters but also for static objects (doodads, weapons, objects on the map, etc.). In addition to simple static objects, M2 is used to create skyboxes and scenes. Skyboxes are M2 models that are used for maps to display it as the sky above the character’s head. This is how the skybox model usually looks - 3d sphere with the texture planes inside it Scenes - M2 models used in non-game areas of the game, for example, login screen, character selection and creation screen, etc. Horde character screen M2 scene Models: WMO - World Model Object wiki link What is World Model Object? World Model Object or just a WMO is a special compound 3D structure used in the game World of Warcraft for making buildings, dungeons, and other big complicated 3D objects. It does not only contain traditional 3D model parts as geometry, UV maps, materials and so on; but it does also support features like liquids, complex lighting system, portal culling system and much more. There are two types of WMO files, actually: WMO root file - lists textures (BLP Files), doodads (M2 or MDX Files), etc., and orientation for the WMO groups WMO group file - 3d model data for one unit in the world map object The root file and the groups are stored with the following filenames: World\wmo\path\WMOName.wmo World\wmo\path\WMOName_NNN.wmo There is a hardcoded maximum of 512 group files per root object. WMO groups World of Warcraft WMO supports two group types - indoor and outdoor. Outdoor is used for exterior objects and is influenced by the zone lighting. Indoor is used for interior models, interior parts of models. It is not getting influenced by the external light. If you are planning to use indoor groups in your scene, you will have to create portals for them. Each WMO group has various settings: Name - Object's name is saved into the files and is only used for development purposes, for example, when you inspect your model using a 010 editor. Please do not name as "Antiportal", an internally reserved name that actually makes sense for the game. Description - group description, which is also used only for development purposes. Name it whatever you want or leave blank. Place Type - select type for your group: indoor or outdoor. Flags - enable/disable different flags for your model. DBC GroupID - connected with AreaID for WMO. Used to detect indoor groups, for example, so the server can dismount you when you enter them. LiquidType - fills this WMO group with selected liquid. Materials Materials are an enhancement of texture mapping (and a pre-requisite for advanced shading effects) that allows for objects in 3D modeling packages and video games to simulate different types of materials in real life. They are typically used to enhance the realism of polygon meshes and other forms of 3D model data. They associate additional properties such as advanced rendering parameters (e.g., specularity) or sound triggers alongside texture information for surfaces. For example, if a texture makes an object look like wood, it will sound like wood (if something hits it or is scraped along a surface), break like wood, and even float like wood. If it was made of metal, it will sound like metal, dent like metal, and sink like metal. A materials system allows a digital artist or game designer to think about objects in a different way. Instead of the object just being a model with a texture applied to it, the object, or part of the object, is made up of material. Examples of major materials might be wood, concrete (or stone), metal, glass, dirt, water, and cloth (such as carpeting, curtains, or clothing on a character). Here is the list of WoW material parameters: Shader used for producing special WoW render effects Terrain Type used for producing footsteps sounds and footprints Blending used to control texture blending on rendering Texture 1 diffuse texture (object) Texture 2 environment texture (blending) Flags used for defining special render options for the texture (see list of Material Flags below) Emissive Color the color of the object when no light falls on it Diffuse Color base color of the object Material Flags Flags are toggleable options of individual material Unlit disable world lighting effect Unfogged disable world fog effect TwoSided render from both sides Exterior light ignore local WMO lighting, use world lighting instead NightGlow used for windows to glow at nighttime Window has no description yet, used for windows Portals A portal is a plane that, in most cases, contains only four vertices and one face. Portals are created as separate objects (you can see them in the outliner if you import some original WMO as I did with the human farm) Portals are polygon planes (usually quads, but they can have more complex shapes) that specify where separation points between groups in a WMO are - these are usually doors or entrances, but can be placed elsewhere. Portals are used for occlusion culling and are a known rendering technique used in many games (see Portal Rendering on Wikipedia and Antiportal on Wikipedia for more information) Portals are used to connect indoor groups to outdoor groups or other indoor groups. If the portal is not set, but the indoor group is used, you will have the indoor group rendered only while standing in it; everything else will look like emptiness. Batch Types. Lightmaps. Blendmaps Demonstration from Blender how batches and maps managing process looks for human farm Batches are groups of faces which are used to accelerate rendering. World of Warcraft WMO supports two batch types - Batch A and Batch B. Batches are usually used only for interior groups. Batch A is influenced by the outdoor (zone) lighting. Batch B is not getting influenced by the external light from outdoor groups. Lightmaps - used to accelerate light rendering. They are normally used in Batches A in order to blend the geometry with world lighting. See the entrance of the human farm in order to see how it works. Blendmaps - used to accelerate texture blending. If your material is using one of the TwoLayer shaders, you enter a second environment texture path, which will blend with the diffuse texture according to lightmap values. Fog You can see how the far objects are getting 'flat-colored' The fog effect mimics the scattering of light in a fog. Objects in the distance become less contrasting and acquire a fog color. In night scenes fog is usually dark, in daytime - whitish or slightly bluish, just like real fog. The fog has some simple options to work with: Ignore Radius (probably) makes fog global Inner Radius a radius of fog starting to fade Farclip anything further away from the eye than the far clipping distance isn't displayed (it's too far away) Nearclip anything closer to the eye than the near clipping distance isn't displayed (it's too close) Color fog color Underwater farclip same as Farclip, but under the water Underwater nearclip same as Nearclip, but under the water Underwater Color fog color under the water Water Water - used to make the liquid in your model. The liquid group has own options: LiquidType - type of liquid in WoW. There are lots of variants to work with: Color - water color WMO Group - parent group for this liquid Flags - with the vertex paint you will be able to set flags to quads that control the rendering of the water. We do not yet know what most of them mean, so if you figure that out, please tell me or Skarn about it Vertex Color You can paint vertex colors on WMO groups. It is used for lighting and coloring particular places of a group. Demonstration of vertex color painting in Blender Doodads Demonstration of doodads placement in Blender with WoW Model Viewer Doodads in WoW are M2 model files. Doodad sets specify several versions of "interior decoration" for a WMO. Like, a small house might have tables and a bed laid out neatly in one set, and have a horrible mess of abandoned broken things in another set called "Set_Abandoned01". DoodadSet DoodadSets are used to group doodads on your scene into sets. The model can have multiple sets that can be chosen in the map editor to be displayed in one particular WMO instance. Normally they are used to create different furniture blocks to add some variations to the appearance of the model. See the human farm once again as an example. Another common usage is to create the normal set of furniture and the broken set of furniture, see Westfall packs of human buildings. DoodadSets are exclusive except for the very first one, "Set_$DefaultGlobal" which is additive and is always displayed. The client determines that set by index, not name though. Up to 8 doodad sets can be enabled at the same time, e.g. via destructible buildings or garrisons. There is always one global doodad set that is displayed along with the selected set. Global doodad set cannot be turned off, however, it may be empty. See the global doodad set in human farm - it contains a few crates, some barrels, and smoke coming from the chimney. Those doodads are displayed on all the sets available. Maps: ADT wiki link ADT files contain terrain and object information for map tiles. They have a chunked structure just like the WDT files. A map tile is split up into 16x16 = 256 map chunks. Map size, blocks, chunks Introduction All maps are divided into 64x64 blocks for a total of 4096 (some of which may be unused). Each block is divided into 16x16 chunks. Map size Each block is 533.33333 yards (1600 feet) in width and height. The map is divided into 64x64 blocks so the total width and height of the map will be 34133.33312 yards, however, the origin of the coordinate system is at the center of the map so the minimum and maximum X and Y coordinates will be ±17066.66656). Since each block has 16x16 chunks, the size of a chunk will be 33.3333 yards (100 feet). Player's speed The basic running speed of a player (without any speed modifying effects) is 7.1111 yards/s (21.3333 feet/s). The player is able to reach one border of an ADT tile from another in 75 seconds. Thus, the fastest mounts (310%) can get over ADT size in 24.2 seconds. ADT files and blocks There is an .adt file for each existing block. If a block is unused it won't have an .adt file. The file will be: World/Maps/<InternalMapName>/<InternalMapName>_<BlockX>_<BlockY>.adt. <InternalMapName> - MapRec::m_Directory <BlockX> - Index of the tile on the X-axis <BlockY> - Index of the tile on the Y-axis Converting ADT co-ords to block X/Y can be done with the following formula (where the axis is x or y): floor((32 - (axis / 533.33333))) An important note about the coordinate system used Wow's main coordinate system is right-handed; understanding it is very important in order to correctly interpret the ADT files. It's important to remember that: The positive X-axis points north, the positive Y-axis points west. The Z-axis is vertical height, with 0 being sea level. The origin of the coordinate system is in the center of the map. The top-left corner of the map has X = 17066, Y = 17066 The bottom-right corner of the map has X = -17066, Y = -17066 The bottom-left corner of the map has X = -17006, Y = 17066 The top-right corner of the map has X = 17006, Y = -17066 Maps: WDT wiki link WDT files specify exactly which map tiles are present in a world, if any, and can also reference a "global" WMO. Maps: WDL wiki link WDL files contain a low-resolution heightmap for a world. This is probably what the WoW client uses to draw the solid-colored mountain ranges in the background ('in front of' the sky, but 'behind' the fog and the rest of the scenery). It can also be conveniently used to construct a minimap - however, since no water level information is present, the best guess is 0 (sea level) - this results in some lower-than-sea-level areas being blue on the WoWmapview minimap. Textures: BLP - Blizzard Picture wiki link BLP files store textures with precalculated mipmaps. Mipmapping Demonstration of mipmaps in BLP Lab In computer graphics, mipmaps (also MIP maps) are pre-calculated, optimized sequences of images, each of which is a progressively lower resolution representation of the same image. The height and width of each image, or level, in the mipmap is a power of two smaller than the previous level. Mipmaps do not have to be square. They are intended to increase rendering speed and reduce aliasing artifacts. A high-resolution mipmap image is used for high-density samples, such as for objects close to the camera. Lower-resolution images are used as the object appears farther away. How it works: Each bitmap image of the mipmap set is a downsized duplicate of the main texture but at a certain reduced level of detail. Although the main texture would still be used when the view is sufficient to render it in full detail, the renderer will switch to a suitable mipmap image when the texture is viewed from a distance or at a small size. Rendering speed increases since the number of texture pixels (texels) being processed per display pixel can be much lower for similar results with the simpler mipmap textures. If using a limited number of texture samples per display pixel (as is the case with bilinear filtering), then artifacts are reduced since the mipmap images are effectively already anti-aliased. Scaling down and up is made more efficient with mipmaps, as well. Image showing how mipmaps reduce aliasing at large distances. Note the moire pattern on the left image Mipmaps are used for: Level of detail (LOD) Improving image quality. Rendering from large textures where only small, discontiguous subsets of texels are used can easily produce moiré patterns Speeding up rendering times, either by reducing the number of texels sampled to render each pixel, or increasing the memory locality of the samples taken Reducing stress on the GPU or CPU BLP files are capable of storing data in a few different formats. The RGB formats are stored using DXT compression (DXT1 for 0-bit alpha and DXT3 for the others), and thus conversion to these formats is somewhat lossy. Here is a list: Palettized, 0-bit alpha - Example: character skins, clothing Palettized, 1-bit alpha - Example: clothing (relatively rare) Palettized, 8-bit alpha - Example: clothing RGB, 0-bit alpha - Example: Sansamroot.blp RGB, 1-bit alpha - Example: Peaceflower.blp RGB, 8-bit alpha - Example: Sungrass.blp Alpha Bit DepthsThis is the amount of detail allowed in the transparency of your image. 0-bit - No transparency at all 1-bit - Simple transparency, similar to GIFs. It's either transparent or not 4-bit - Slightly better range of transparency, but will turn smooth fades into visible "steps" 8-bit - This is the same level of transparency you'll ordinarily see in PNG/TGA formats, with 256 levels of transparency Compression Types Indexed (256 Color) - Very similar to a GIF, as it uses a palette that can fit up to 256 colors, but BLP files have independent transparency. Indexed BLPs can make use of all four types of alpha. DXT - This is the defacto compression type used in modern games, with the most popular format that uses this, being .dds. DXT compression gives you a better color range, with a slightly larger size than indexed. It also supports all four levels of transparency. DXT-5 - Would generally be lumped in with the above category. However, it's the second DXT type that supports 8-bit alpha. The result is a bit better color and slightly larger file size than the 8-bit alpha under the DXT category. Uncompressed - Very much like a Bitmap, but without compression. It can support either 0-bit or 8-bit alpha. Blizzard only uses this version for sky textures, where every bit of color detail is necessary. TODO: Liquids, DBC
-
Sure! It would be nice!
-
-
Blender version 2.78 is not supported since the release of 2.79 and 2.8 The last up-to-date version of WoW Blender Studio based on 2.79 and given only to a small group of people for tests and bug research Skarn works on version 2.8. There is no release date
-
Hey, @bizzlesnaff. The old version of the WoW Blender Studio works only with Blender 2.78 and isn't supported anymore (even for 2.79). The new one (for Blender 2.8) right now is in active development state, so you can watch on it in official WBS Discord Invite link: https://discord.gg/mWnjkVh
- 1 reply
-
- 1
-

-
I really like your idea about how to approach complex WMO. Most of the people wants to know how to start making something big and global, e.g. a quarter of city or complex modular building. Added complex WMO proposals How can I forgot about animations and M2s... Added M2 proposals Added animation proposals Yeah, particles is a neat thing people wants to know and I'm capable to teach people how to make it in the beautiful and correct way. We just need to wait until Blender 2.8 particle branch will go to master-branch. Added particle proposals
-
Green models mean there are missing textures. Check them and bring back missing ones.
-
@Murkablo shadowfangkeep.obj shadowfangkeep.mtl
-
What file format do you need? WMO/OBJ?
-
There is no rule 'pay to be chosen'. This small group of testers was created by Skarn to imporve bug-finding process and make a little 'share' with the community. But Skarn also appreciates any help and donations, so it's better to write to him directly. @Skarn Discord: Skarn#6841
-
Oh, sorry, my bad. This branch of WoW Blender Studio is still in development. It can be used by small amount of people in alpha-testing group. You need to wait until the WoW Studio will be finished, Skarn continued his work on the addon.
-
You should fill this path. Then, you should type in the search (hit 'Space' in the viewport) 'Creature Editor': If your game path to the model is correct, there will be an option to choose texture from DBC.
-
It's export extension plugin. If you want to export your file as .blp (instead of png or tga, for example) you need to choose BLP option in the export filetype list.
-
-
Client-server architecture As we all know, World of Warcraft is an online game(!). A fully-fledged multiplayer process requires a connection between the client (the game executable on a player's computer) and the server, which manages player interaction and the content not located client-side. The diagram below presents an abstract overview of the game's client-server architecture. Each of the elements shown is, to various extents, a potential subject for your modifications. Do not worry if you find yourself confused by some of these definitions - each will receive a detailed explanation in the upcoming tutorials. The MPQ Files All WoW client data is stored in MPQ files. You can find them in the folder: your_wow_folder/Data/ And also in the local subfolder. This folder is named with your language code. It can be called as enUS, enGB, ruRU, frFR, etc. MPQ files are archives like ZIP or RAR. They contain all the data the game needs, e.g. models, maps, textures, etc. Blizzard uses several own filetypes where you need specialized applications to edit them. But also mp3 or simple text files for Lua and XML code. In the following, I will explain some data you will find in the MPQs. To mod WoW, you have to extract the files, edit them and pack them again in the MPQ patch, so the client will load them. In the next tutorials, we will show you how it works. Common WoW File Types Below you can see short description of WoW File types. We will describe them individually in the next part of the tutorial. BLP - Blizzard Picture Blizzard's image format. You can find textures, maps and interface elements with this type DBC - DataBase Client DBCs store the data for the client. This is a table of values that contains data about the particular area of the game client. E.g., what maps you have, how spells should work and much more LUA - script files in the Lua programming language These files define the actions of the interface. For example what happens if you click the Login button XML - files in the XML (Extensible Markup Language) These files define the look of the interface. It places images, models and UI elements M2 These models are used for doodads (decoration objects), players, monsters and really everything in the game except for Terrain and WMOs SKIN Contains the information about different levels of detail and geosets for M2s WMO - World Models Models like houses, bridges or even full cities and dungeons like Stormwind or Deathmine ADT Contain terrain and object information for map tiles WDT - map definition file It defines what ADTs on the map exist, or the map is built only out of one WMO like instances WDL Low-res heightmap of all ADTs of the map. This file is used to display far away mountains. Wav/mp3 Sound files for music and effects
-
1. BLP Lab Very buggy variant for you, but there is a possibility for a batch conversion 2. Photoshop BLP plugin There were no bugs for me, stable thing. If you know how to handle photoshop actions, you can also do batch conversion there. P.S. There is also WIP converter from Skarn and Cromon, but this one is not finished yet.
-
-
@yopel2 Your screenshots are broken, please, reupload them. Btw, we need to know how exactly you trying to convert your models into wow file formats.
-
Testing your work without MPQs This tutorial explains how to test your edits without repacking the MPQ every time you change something. At the end of the tutorial your WoW client will be reading directly from its folder to save your time. Installation: Download the patched Wow.exe and replace the original one with it. Recommended to make a backup of an original one Create a folder named Patch-X.MPQ (any letter or number instead of X) and put your edited files in there. WoW client reads patches in alphabetical order. First is reading of numeric patches (from 1 to 9), then reading of letter patches (from A to Z) Since in 3.3.5a there are already patches from 1 to 3 you can name your patch as patch-4.mpq or patch-5.mpq etc. The count of available patch names is limited by unused numbers and letters Now your client can read directly from that folder, so you don’t have to create patches. Though, there are ways to make your work more convinient in Noggit too. Find a string called Project Path and fill its value with a path to your patch-folder. An example: C:/Work/World of Warcraft/patch-4.mpq Once done your Noggit will save files directly to this folder. You can run both Noggit and game client at the same time. In order to see the changes you saved, you will need to reload the map in game. You need to teleport to a different zone and back. Type these commands in your chat window (you can also create a macro for that): .tele gmisland (teleports you to GM Island zone) .recall (teleports you back to your initial teleport location) Make sure not to save anything in Noggit while the client is loading a map and vice versa. It can be dangerous for your files Advanced. Patching your own .exe and understanding how it works You may want to do a similar hack to your own WoW.exe because it can be modified with something else. Here we will explain the way to do it. Credits for the .exe patch go to schlumpf and Mjollna. Start Sweetscape 010 Editor and open your WoW.exe in it Edit > Search Turn on Use wildcards, set the seach type to Hex bytes and search the following pattern: E8 ?? ?? ?? ?? 6A 00 E8 ?? ?? ?? ?? 6A 02 Replace the beginning of the pattern with (for any version of WoW): 90 90 90 90 90 6A FF or the entire string for WoW 3.3.5a with: 90 90 90 90 90 6A FF E8 2A EC 01 00 6A 02