
Basto&co
-
Content Count
107 -
Joined
-
Last visited
Everything posted by Basto&co
-

Version 1.0.0
84 downloads
[GER] WoWClear3.3.5.a.zip Here you get a Clear 3.3.5.a Client in German. You can download it during the night or however. General-Blizzard-Patches include. Decryption-Key: !qGEr3uGtFu47pApg-YfqeOSNjZGcS8gxHkMvEGIQDew -

start location How to change starting area location (Easy going)
Basto&co posted a tutorial in Serverside
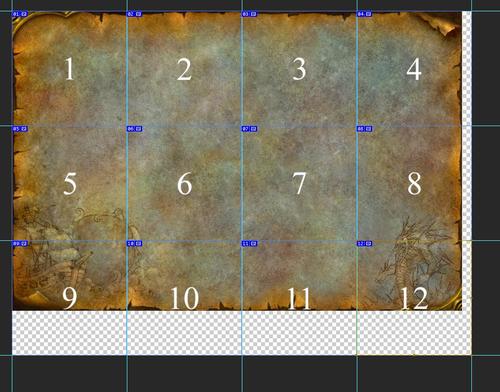
Index: - What you need - Step 1 till 3 - One-Look-Understandable-Picture What you need: - a WoW 3.3.5a Trinity Server - your World of Warcraft _world-Database __________________________________ For Custom port-points: - Noggit for a Custom map - Your builded patch Step 1: Go ingame to a nice area, there you want your players to start up. When you found your place - press ingame the Admintask ".gps" to get the coordinates. Note: You get also the sightvew (orientation) Step 2: Go to your world-database -> table: playercreatinfo. So you can see now the single locations of each race. Insert you coordinates to the single collums. Step 3: Save your work and restart the world. (.server restart 1) and try it =) One-Look-Understandable-Picture:- 1 comment
-
- 3
-

-
- 3.3.5
- _world-database
- (and 1 more)
-

Version 1.0.2
604 downloads
[Human] House collection Here you can find a bucket of retextured Houses and other Human stuff! Further down you can see the whole patch, what kind of .wmo's you will find in the patch! Please say it, if anything is missing. Leave a like or a comment =) To try it by yourself - look at the file [Human] General colored Human roofs 3 Models, 9 colors! or also [Stormwind] Sliced Stormwind Houses retextured Enjoy it! Decryption-Key: !4hVLkqffpRAhUF1laSzHGMh5swHle13GmsDcxDj0eqk List: Human Wostorys & Farms Human Silos Human Guildhouses Human Barns Human Lumbermills Human Magetowers Human Barracks Human Chapels Human Inns Human Goldmines Human Blacksmiths Human Mills Human Stables A huge Thanks at this point to @Valkryst! -
Thanks champ. If i'm allowed and if there is interest - i would translate it to german. Greets, Basto
-

Version 1.0.0
758 downloads
[Patch] Cata till MoP To help other or newbies in the community, i will share my patches whi i collected over moths and years in the community, Prefer to use at Noggit or Modelviewer. You can also find Maps, titlesets, textures ect. Please say it is something missing. Warning/Note: I check up, that nothing is broking. Short: I sorted broken files out. I know, most of the Azeroth special MoP-wmo's are missing, for example the Hobbit-like-hoods! =) Decryption-Key: Link 1: !h64voaMrlnR1_KwRWIv-dihPcVZjvM29uJH2sDhDMXc Link 2: !XyNp7SbJ8f817aQwp4uMw6De_o3Q_f8EapMESRwtv34 Link 3: !82Q_EsfEnRjFgRI66f31bA2o5Pv_iC1JcABuBkIhOnY Link 4: !BRPcuAqbodZ4Xqw7nhbp58JCkkqC_p-GptNUPuCNolc -
Stuck in my head. One of my champ's have a problem with upshowing weapons of npc's. Somebody have a straight tut for me?
- Show previous comments 1 more
-
Thanks a lot, @Zehlendorf . Well know this video, but might dont help. Let me explain the prob: Also when he spawn a NPC, for example a standard stormwind guard who have by default a weapon - its not upshowing. Its like... there is a command missing or smth. like that.
-

Hmm i had that problem, but was because i use a custom Item.dbc, and I do all the steps in the video, first generate in my db all the missed items that are in the originally Item.dbc, then generate a new Item.dbc with all that missed items and the custom ones, then all the npcs in this case the guardians of stormwind or orgrimmar appears with their own weps without any problem.
-
-
V2 - Benötigten Programme einrichten Es wurde ein Packet erstellt, in dem alles erhalten sein sollte, was wir nun für einen Start in einer guten WoWModding Umgebung brauchen werden und für das Tutorial bestimmt vorhanden sein muss. Ihr brauch im späteren Verlauf auch solche Umgebungen und daher gleich der Hinweis, haltet die Umgebung so "sauber" und geordnet wie es nur möglich ist um empfindlichkeitsfehler zu vermeiden. Die Installation wird zwar einige Zeit in Anspruch nehmen, aber dafür spart ihr diese später ein und verhindert zeitgleich Probleme, wie zerschossene World of Warcraft Dateien oder dass ihr die falschen Dateien bearbeitet bzw. die falschen Programme verwendet. http://www.file-upload.net/download-7667252/WoWModding.zip.html Ladet nun bitte dieses .zip Archiv runter und extrahiert es in eines der Oberverzeichnisse eurer Festplatten. Diese sollte: mindestens 70Gb freien Speicherplatz haben einen der folgenden Laufwerksbuchstaben haben: C, D, E, FErstellt euch gleich am besten den Modding-Ordner, der bei euch richtig wäre. Beispiel: C:\WoWModding\D:\WoWModding\E:\WoWModding\F:\WoWModding\ Wenn ihr F verwendet, so werden die Pfade im Rest des Tutorials überein stimmen; ansonsten verwendet bitte euren Hausverstand und nehmt euren entsprechenden Laufwerkbuchstaben! Ihr habt nun also einen Ordner namens wowmodding auf der Festplatte, der so aussehen sollte, wie auf dem Bild, wenn ihr die .zip-Datein extrahiert habt und alles hinein kopiert. V2.1. - Ordner (-chaos) Als kurze erklärung, erfährt ihr hier kurz was für was ist - also noch mehr Theoriewissen =) Client335aNoggit = Das "QuellWoW" für Noggit. Tut euch den gefallen und haltet ihn "clean". Noggit mag euch sonst nicht mehr.Client335aTest = Das "QuellWoW" für den Modelviewer und zum Patch testenClient Files = Alle aus dem Client extrahierten Dateien. So seht ihr schnell wo was ist bzw. wie so ein Patch aufgebaut ist.Projects = Der Ordner, der alle unsere Projekte sindTools = Anwendungen und nützliche Sachen, die wir in den Tutorials verwenden werden. ( Im späteren Verlauf, werdet ihr merken das immer mehr dazu kommen wird, so habt ihr dann schon ein "Schrankfach") Nun eine Liste von allem, was sich so in Tools findet, auch wenn es nun etwas verwirrend sein wird - sobald ihr etwas fortgeschrittener seit, wisst ihr schon was damit anzufangen ist: 010Templates = Templates für den 010 Hex Editor um einfacher hex-Modifikationen an Dateien vornehmen zu können.ADTAdder = Ein Programm um neue ADTs aus einer Quell-ADT zu erstellen.AllWaterGui = Ein grafisch gestalltetes Programm um das Wasser auf einer ADT zu bearbeiten.BLPConverter = Konvertiert PNG in BLP Dateien und umgekehrt.BLPShellExtention = Zeigt BLP Dateien als Thumbnails (kleine Vorschaubildchen im Ordner).CMD = Einige notwendige CMD ProgrammeDriveLetter = Installationsdateien für dieses Packet. Setzt die Konfigurationsdateien of den von euch verwendeteten Buchstaben.FuTa = Ein ADT alpha-map Importier- und Exportierprogramm. Nützlich, um schnell zu texturieren.MPQEdit.1.1 = Verwaltet MPQ Dateien (öffnen, extrahieren, erstellen).MPQEdit 3.2 = Verwaltet MPQ Dateien (öffnen, extrahieren, erstellen).MyDBCEditor = Ein Modifikationsprogramm für DBCsNoggitSDL = Ein ADT-BearbeitungsprogrammNoggit1.4 = Ein weiteres ADT-Bearbeitungsprogramm, sofern gedownloadedProjectTemplate = Eine leere Ordnerstruktur, von der aus ein Projekte gestartet wird.Taliis = Ein Programm um WoW Dateien zu modifizieren. Wir nutzen es um WDTs zu erstellen.WoWModelViewer7 = Guckt euch M2 und WMO Objekte an und nutzt dieses Programm um sie in Noggit zu importieren V2.2 - Moddingumgebung einrichten Nachdem ihr die Dateien entpackt habt müsst ihr die folgenden Schritte befolgen, um alles zum Laufen zu bekommen. >>> Öffnet den folgenden Ordner F:\WoWModding\Tools\DriveLetter >>> Öffnet den Unterordner, der zu eurer Festplatte passt und kopiert den enthaltenen Tools Ordner in den folgenden Pfad. Überschreibt hierbei alle vorhanden Dateien. F:\WoWModding Dies kopiert die Konfigurationsdateien einiger Anwendungen, so dass diese nun auf euren Laufwerksbuchstaben zugeschnitten sind - wie gesagt - sofern nicht F, bitte mitdenken! >>> Kopiert den Inhalt von einem sauberen (sprich originalen) World of Warcraft Stand 3.3.5a in die beiden Client Ordner. Schiebt da nicht einfach nur einen World of Warcraft Ordner rein: das wird nicht funktionieren, siehe Bild - so sollte es aussehen: F:\WoWModding\Client335aNoggit F:\WoWModding\Client335aTest >>> Öffnet nun die folgenden Anwendungen, um zu sehen ob alles geht. F:\WoWModding\Tools\NoggitSDL\noggit.exe F:\WoWModding\Tools\WoWModelViewer7\wowmodelview.exe V2.2.1 - Die MPQs zerteilen/extrahieren Um dies zu vermeiden extrahiert alle MPQs in der nachfolgenden Reihenfolge in ClientFiles und überschreibt immer brav vorhandene Dateien. Alle MPQs, die in ClientFiles müssen sind. Aus dem WoW/Data Ordner (Nehmt dazu Client335aTest): common.MPQcommon-2.MPQexpansion.MPQlichking.MPQpatch.MPQpatch-2.MPQpatch-3.MPQAus eurem lokalen Ordner (deDE, enUS, enGB, ruRU etc.): locale-enUS.MPQexpansion-locale-enUS.MPQlichking-locale-enUS.MPQpatch-enUS.MPQpatch-enUS-2.MPQpatch-enUS-3.MPQ >>> Öffnet dazu MPQEdit 3.2 aus dem Tools Ordner. >>> MENU > File > Open MPQ >>> Wählt die erste Datei ganz oben (links!) und öffnet sie (In diesem Fall ist es die common.MPQ im WoW/Data Ordner. Zur erinnerung nehmt die Pacthes aus Client335aTest) Wählt die erste Dateiliste von oben aus und öffnet sie. Es ist die common.mpq im WoW/Data Ordner. Nehmt einfach die MPQs aus Client335aTest. Links seht ihr die Struktur in der MPQ. Wählt hier den obersten Ordner aus, wie im Bild gezeigt. >>> MENU > Operations > Extract Setzt alle Optionen so, wie es im folgenden Bild gezeigt wird. Der Pfad sollte auf das folgende Verzeichnis zeigen: F:\WoWModding\ClientFiles Der MPQEditor wird nun alle Dateien aus dem Verzeichnis in das Zielverzeichnis kopieren bzw. extrahieren. >>> Wiederholt das mit allen MPQs aus den Listen oben. Jetzt habt ihr die richtigen Dateien immer zu Hand und könnt sie auch mit eurer OS-Suchfunktion über den Dateinamen finden. Ihr solltet die BLPShellExtention aus dem Toolordner installieren. Es wird .BLPs eine Miniansicht hinzufügen, was nicht mit "Ansicht->Große Symbole" gemeint ist, da man .blp's unkonvertiert nicht sehen kann und somit das ganze ein Stück leichter macht. So könnt ihr Bilder und Texturen schneller finden. Sollte dann so aussehen: >>> F:\WoWModding\Tools\BLPShellExtention -> BLPView1.2.exe Nun sollte alles einsatzbereit sein. Im nächsten Kapitel wird eine Testserver aufgesetzt. Wenn euch das nicht interessiert überspringt es einfach und lest im übernächsten nach, wie wir unsere erste Insel in Noggit bauen. Ich möchte zu bedenken geben: Auch wenn ihr einen Root-Server habt, ist ein eigener Lokaler Server in sofern praktisch, das ihr damit wahrlich testen könnt. Und sollte mal was schief rennen, könnt ihr diesen Server schneller wieder neu aufsetzen als einen Root!
-
Greetings Community! I hope you can help me plus i hope its the right topic-section. I've try the last 4 days to solve the problem behind "0xc000007b". I try to mod on WoD, so i download the modding-kit & server kit from modcraft.io for WoD. First there where some .dll's missing - i checked this and got them. So every time when i start my world-server.exe i get the "0xc000007b"-problem. What i've done till now: 1. I kicked all .dll's, redistributable (x86, x64), programms who can install wrong .dlls (for example, .net framework, adobe, visual studios and so on) and reinstall them all rightly for my bit-version. Now i dont have any problems yet about this freaky-fucking missing .dll but always get the 0xc000007b-fail. 2.) I also checked with "Depends22" the bit-version of the needin' .dlls. 3.) I've try to install a clean AIO-runtimes, to get the standard-windows-programms clean (Java, Adobe and so on) Notes: It works all fine for my 335a worldserver.exe/noggit/WMW ect. and modding workplace, no problems, no 0xc000007b's (at the beginn of my reinstall i checked this, i killed some .dll's who are needed but i get them back so it work fine again) I dont have any knowledge about registry-working, so i never touched them to do it by myself - repairing or look if they are damadged (I hope not!) Greets, Basto&co
-
Yeah sure. Thats why i checked all .dlls about their "bit-version". And yeah they are all now the same 'nd it dont work atm. =/
-
 Thanks! I will check this out. First of all i need a general custom-patch with all stuff back. Will return and give you some stars
 -
Hell! My modding hard disc fucked up D:
- Show previous comments 4 more
-
-
-
I have always used Windows, never had problems and I compiled the server yesterday for about one hour(I had my WOTLK client on laptop and quickly moved the files while I also saved vmaps and mmaps which take quite long to extract). My disk failed while I was downloading WOD 6.2.4 client, I'm really interested in WOD modding but I won't "experiment" right now with my disk.If you need any help you can just pm me.
-
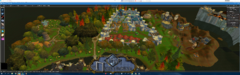
From the album: Project - Titan - Progress
Alliance-Isle: The Human & dwarf section, N8ves & dranei getting a seperat section -
 Thanks dude! Now i know how this kind work also on gimp! (grids - slices - sub-areas, THANKS!) "Save for web": Wich data-ending did you mean? .xhtml?
 -
/* Install a WoW Server on Linux (Debian 8.0) from scratch Wrote by Basto, after the 6th reinstall! (Server raid) You are allowed to share this with credits */ _____________________________________________________ -First of all: <apt-get update> <apt-get upgrade> <apt-get install> # You can do this always. So you keep your Server up to date _____________________________________________________ -Secuity#1: #Change default User-Root-Password <passwd "Username"> # Enter password two times #Add new User for more security <adduser "Username"> # Enter password two times _____________________________________________________ -Security#2: #SSH default Port change. Set the port new. Example 9988 <nano /etc/ssh/sshd_config> #SSH Root Login denied. Note: Now you have to login with your new Username. When you have something to install, switch on the SSH window the username to root with [su <User>]. The intention about this is, nobody can hack you with the always known username "root" <nano /etc/ssh/sshd_config> #Change the row from (Yes - to no). You can use STRG + W (left klick to paste your searching copy to find it). CTRL + O = Save CTRL + X = Exit "PermitRootLogin yes" to "PermitRootLogin no" </etc/init.d/ssh restart> _____________________________________________________ -General Settings & install: <apt-get install screen> # See also "Screening for Idiots" <apt-get install mysql-server> # See also "MySQL Configs to reaching from outside" _____________________________________________________ -Ground Server Install: <apt-get install build-essential autoconf libtool gcc g++ make cmake git-core wget p7zip-full libncurses5-dev zlib1g-dev libbz2-dev> # Accept <apt-get install openssl libssl-dev mysql-server mysql-client libmysqlclient-dev libmysql++-dev libreadline6-dev> <apt-get install libboost-dev libboost-thread-dev libboost-system-dev libboost-filesystem-dev libboost-program-options-dev libboost-iostreams-dev> # Accept _____________________________________________________ -Core Set-up: <adduser "username"> # We also use here a new Username for more security. For example; wow <su "username"> <git clone -b 3.3.5 git://github.com/TrinityCore/TrinityCore.git> # This task will load the need things <cd TrinityCore> # Move to the Folder TrinityCore <mkdir build> # Build the folder build <cd build> # we move into build... _____________________________________________________ # !Hold on and read first! # To configure the core, we use space-separated parameters attached to the configuration-tool (cmake) - do read the entire section before even starting on the configuration-part. # See also <Parameters> further down _____________________________________________________ <cmake ../ [additional parameters]> # Examples: <cmake ../ -DCMAKE_INSTALL_PREFIX=/home/<username>/server -DWITH_WARNINGS=1> # or <cmake ../ -DCMAKE_INSTALL_PREFIX=/home/wow/server -DCONF_DIR=/home/wow/server/etc -DTOOLS=1 -DWITH_WARNINGS=1> <make -j "number of cores"> # This will take now a little bit of your time. Caused by your core volume <make install> # Finished. Next: Database _____________________________________________________ <<<Parameters:>>> -DSCRIPTS * Build core with scripts included (enabled by default) * -DSERVERS * Build worldserver and authserver (enabled by default)* -DCMAKE_INSTALL_PREFIX Set installation directory -DTOOLS Build map/vmap extraction/assembler tools -DTOOLS=1 (will include tools (and connection_patcher on 6.x)) -DWITH_WARNINGS Show all warnings during compile (advanced users only) -DCMAKE_C_FLAGS Set C_FLAGS for compile (advanced users only) -DCMAKE_CXX_FLAGS Set CXX_FLAGS for compile (advanced users only) -DUSE_COREPCH * Use precompiled headers when compiling servers * (advanced users only) -DUSE_SCRIPTPCH * Use precompiled headers when compiling scripts * (advanced users only) -DWITH_COREDEBUG Include additional debug-code in core (advanced users only) -DCONF_DIR Set configuration directory (advanced users only) -DLIBSDIR Set library directory (advanced users only) _____________________________________________________ -Screening for idiots: <screen -ls> # Look wich screen is atm running <screen -S world> <cd /home/<Username>/server/bin> <./worldserver> or <sh worldrestart.sh> <ctrl + A + D> # for close <screen -S auth> <cd /home/<Username>/server/bin> <./authserver> _____________________________________________________ -MySQL Configs: <apt-get install mysql-server> # Accept and give the local user "root" a passowrd <nano /etc/mysql/my.cnf> # Edit: Topic MySQL -> [Port = 3306] to a own port (Attention, there are two ports, look at the right head-topic. Its also for security) and [bind-address = 0.0.0.0] </etc/init.d/mysql restart> #Now let create us a Username <mysql -p> <"Password who you set at beginning"> <CREATE USER 'newuser'@'localhost' IDENTIFIED BY 'password';> # Example: 'basto'@'%' IDENTIFIED BY '123' % = means from outside <GRANT ALL PRIVILEGES ON * . * TO 'newuser'@'localhost';> # ...On *. * TO means wich database and so on <Exit> _____________________________________________________ -Patching the DB: <mysql -p> <"Password"> <use "Datenbasename";> <source "PathToData";> _____________________________________________________ -Keep the Core Up-To-Date: <cd ~/TrinityCore/> #For 3.3.5 Branch <git pull origin 3.3.5> _____________________________________________________ #Note: #Feel free for feedback or if you have some other ideas #Feel also free, to help to complete it. For the basics. For more transparence. To get more people in the community #Edit1: # Forgott a important " ; "
-
just have 2 wide one =) Nice @$phynx! I have a very clean one
-
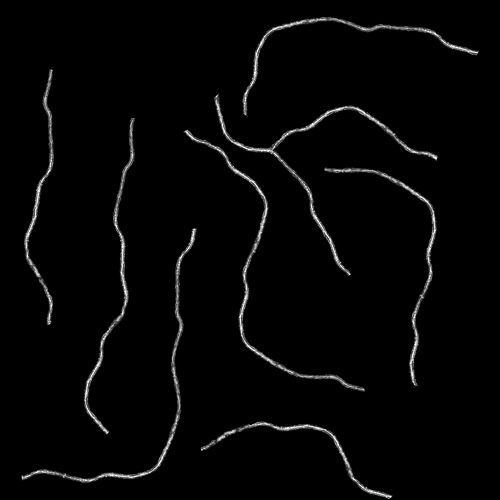 Did you have maybe the stoneroads of the garrison too or just till cata? or did you know, are they not a part of a map and they are also instance? Because i need some nice "town roads" for my alliance town. Goldshire/elwynn helps me jusg for the forest part of my map :-P
 -
Thanks dude! Srsly. I start 2 days ago to complete my "Road-Template-Set"... now its feel like... "Basto? Trolololololo!" :-D
-
Hey Community.After some versions later of the teleport script, i try to write my "Mister Teleporter" script. But in the end, i have the problem: The NPC dont touch my script! Somebody can say, what i've do wrong? (Code in the spoiler). The script is included in the custom folder and also included in the scriptloader-textfile.(Trinity-Core, Rev. actual) The function that i need: A script, that i have only to bind on a NPC (irrelevant wich one) who give some options about location teleportation. For example: "Port me please to XYZ1" -> PortLocation1, "Port me please to XYZ2" -> PortLocation2, "Port me please to XYZ3" -> PortLocation3, "Nah, dont get ported, thanks" -> Close Any solutions? Greets, Basto
-
Index: - Was wir brauchen - Schritt 1 bis 3 - "Auf-den-ersten-blick-alles-verständlich"-Bild Was wir brauchen: - ein WoW 3.3.5a Trinity Server - deine World of Warcraft _world-Datenbank __________________________________ Für Custom Portpunkte: - Noggit für eine Custom Karte - Dein eingebauten Patch Schritt 1: Geh dazu Ingame an einen Platz den du dir wünscht und der dir gefällt - wo die Spieler starten sollen. Nun gib den Adminbefehl ".gps" ein damit wir diese Koordinaten bekommen. Notiz: Sogar die Blickrichtung kannst du für dich entscheiden. Wäre in dem Fall "orientation". Schritt 2: Geh zu deiner Welt-Datenbank (in Navicat oder vergleichbares) worlddatabase -> table: playercreatinfo. Hier siehst du nun die einzelnen location Punkte der einzelnen Rassen und Klassen. Ab der Spalte "Map" beginnen wir die neuen Koordinaten einzusetzen. Probier es für den Anfang nur mal mit dem ersten (Race 1: Mensch, Class 1: Krieger) Schritt 3: Speicher deine Arbeit und restarte die Welt. (Via Konsole oder ingame: ".server restart 1") Dannach probier es mal aus. "Auf-den-ersten-blick-alles-verständlich"-Bild:
- 1 comment
-
- 1
-
-
- sql
- _world-datenbank
- (and 2 more)
-
How to fix a world that crashes on start up?
Basto&co replied to WithinAmnesia 's question in Answered topics
I never touch blizz-maps but i will do a video of that, what @Amaroth said. I indeed with him. But there are little tricks to make this very very fast. Hold on bro -
How to fix a world that crashes on start up?
Basto&co replied to WithinAmnesia 's question in Answered topics
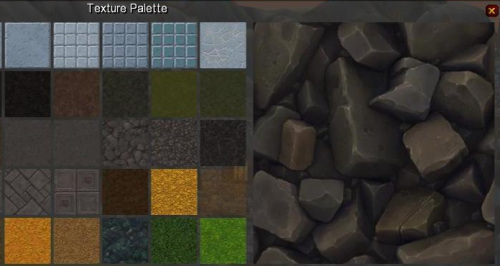
How @Amaroth said: Noggit always need minimum of 3 (or maybe 4 (full)) textures. When you cant fix them with noggit again -> Start the map with a older noggit version. (thats the reason why i have a 1.2 version on my computer, idk WHY the older open it) You dont have to make it show, the textures have only to be in the (1by4 texture tabelle) so take any texture (little hint, i take crap single-clors (red/blue/green) set the pressure and hardness down and draw over all .adts) so that problem will be solved. Its very important in general by modding with noggit (actually blizzlikezones or new one) Next problem maybe: It is possible, that yah have a .wmo/.m2 not standing out of WOTLK? For example, Cata/MoP or some higher? Than you need a "hexed" wow.exe (i dont know what this say exactly, i only know, that the general things need a better version of the exe, so we have to edit them) So thats my ideas about that... poooh. I thought my Noggit Version is broken or something Greets -
@Hyakkimaru I love this dude! >.< A very precious fellow for this Community. Really!
-
My own Server <3 Hell yeah
- Show previous comments 2 more
-

-
Roleplayserver are more than "just talk light old times" (dark age or something like that). The player personify a character, made-up by himself. For example... "A dwarf marksman from Khaz Modan, in search about his own adventure".
The critical point about this all is: We dont need so much about stats, itemgear and so on. (There are more ways to handle it but we would not.)
But in the end you're a bit right. We need the atmosphere that the player can immerse in the story. Difficulty is: Wich pacth rev we take. For example - WOTLK or higher. OR (!) a custom lore. Yeah the lore is a important thing. Also the level design: Own maps, the blizzardmaps clearly taken or revised.
At technical sight: Housing. And its so many support needed. (For example, when you support and play out the npcs) and so on. -
-
Version 1.0.0
262 downloads
Hey Community! I check out my tool files and found something usefull things who are not here on this page. Hope you can need them! The following files include:wmo-converter-rebuild_003_distro wmo-converter-rebuild_004_distro wmo-converter-rebuild_005_distro -> .wmos from WoD -> TBC http://pastebin.com/SU9K03GzPTNG_LKM2_to_TBCM2_Beta_008p PTNG_WoD_Map_ADT_DownPorter_Tool Greets